Tutorials
Tutorial 1: Getting started with micc
Note
All tutorial sections start with the bare essentials, which should get you up and running. They are often followed by more detailed subsections that provide useful background information that is needed for intermediate or advanced usage. These sections have an explicit [intermediate] or [advanced] tag in the title, e.g. 1.1.1. Modules and packages [intermediate] and they are indented. Background sections can be skipped on first reading, but the user is encouraged to read them at some point. The tutorials are rather extensive as they interlaced with many good practices advises.
Micc wants to provide a practical interface to the many aspects of managing a Python project: setting up a new project in a standardized way, adding documentation, version control, publishing the code to PyPI, building binary extension modules in C++ or Fortran, dependency management, … For all these aspect there are tools available, yet i found myself struggling get everything right and looking up the details each time. Micc is an attempt to wrap all the details by providing the user with a standardized yet flexible workflow for managing a Python project. Standardizing is a great way to increase productivity. For many aspects the tools used by Micc are completely hidden from the user, e.g. project setup, adding components, building binary extensions, … For other aspects Micc provides just the necessary setup for you to use other tools as you need them. Learning to use the following tools is certainly beneficial:
- Poetry: for dependency management, virtual environment creation, and publishing the project to PyPI (and a lot more, if you like). Although extremely handy on a desktop machine or a laptop, it does not play well with the module system that is used on the VSC clusters for accessing applications. A workaround is provided in Tutorial 6.
- Git: for version control. Its use is optional but highly recommended. See Tutorial 4 for some git coverage.
- Pytest: for (unit) testing. Also optional and also highly recommended.
- Sphinx: for building documentation. Optional but recommended.
The basic commands for theese tools are covered in these tutorials.
1.1 Creating a project
Creating a new project is simple:
> micc create path/to/my_first_project
This creates a new project my_first_project in folder path/to.
Note that the directory path/to/my_first_project must either not exist,
or be empty.
Typically, the new project is created in the current working directory:
> cd path/to
> micc create my_first_project
[INFO]           [ Creating project (my_first_project):
[INFO]               Python module (my_first_project): structure = (my_first_project/my_first_project.py)
...
[INFO]           ] done.
After creating the project, we cd into the project directory because any
further micc commands will then automatically act on the project in the current
working directory:
> cd my_first_project
To apply a micc command to a project that is not in the current working directory see 1.2.1. The project path in micc.
The above command creates a project for a simple Python module, that is, the
project directory will contain - among others - a file my_first_project.py in
which represents the Python module:
my_first_project          # the project directory
└── my_first_project.py   # the Python module, this is where your code goes
When some client code imports this module:
import my_first_module
the code in my_first_module.py is executed.
Note that the name of the Python module name is (automatically) taken from the project name
that with gave in the micc create command. If you want project and module names to
differ from each other, check out the 1.1.2 What’s in a name [intermediate] section.
The module project type above is suited for problems that can be solved with a single
Python file (my_first_project.py in the above case). For more complex problems a
package structure is more appropriate. To learn more about the use of Python modules
vs packages, check out the 1.1.1. Modules and packages [intermediate] section below.
1.1.1. Modules and packages [intermediate]
A Python module is the simplest Python project we can create. It is meant for rather small projects that conveniently fit in a single (Python) file. More complex projects require a package structure. They are created by adding the
--packageflag on the command line:> micc create my_first_project --package [INFO] [ Creating project (my_first_project): [INFO] Python package (my_first_project): structure = (my_first_project/my_first_project/__init__.py) [INFO] [ Creating git repository ... [INFO] ] done. [WARNING] Run 'poetry install' in the project directory to create a virtual environment and install its dependencies. [INFO] ] done.The output shows a different file structure of the project than for a module. Instead of the file
my_first_project.pythere is a directorymy_first_project, containing a__init__.pyfile. So, the structure of a package project looks like this:my_first_project # the project directory └── my_first_project # the package directory └── __init__.py # the file where your code goesTypically, the package directory will contain several other Python files that together make up your Python package. When some client code imports a module with a package structure,
import my_first_moduleit is the code in
my_first_module/__init__.pythat is executed. Themy_first_module/__init__.pyfile is the equivalent of themy_first_module.pyin a module structure.The distinction between a module structure and a package structure is also important when you publish the module. When installing a Python package with a module structure, only the ‘’my_first_project.py’’ will be installed, while with the package structure the entire
my_first_projectdirectory will be installed.If you created a projected with a module structure and discover over time that its complexity has grown beyond the limits of a simple module, you can easily convert it to a package structure project at any time. First
cdinto the project directory and run:> cd my_first_project > micc convert-to-package [INFO] Converting Python module project my_first_project to Python package project. [WARNING] Pre-existing files that would be overwritten: [WARNING] /Users/etijskens/software/dev/workspace/p1/docs/index.rst Aborting because 'overwrite==False'. Rerun the command with the '--backup' flag to first backup these files (*.bak). Rerun the command with the '--overwrite' flag to overwrite these files without backup.Because we do not want to replace existing files inadvertently, this command will always fail, unless you add either the
--backupflag, in which case micc makes a backup of all files it wants to replace, or the--overwriteflag, in which case those files will be overwritten. Micc will always produce a list of files it wants to replace. Unless you deliberately modified one of the files in the list, you can safely use--overwrite. If you did, use the--backupflag and manually copy the the changes from the.bakfile to the new file.> micc convert-to-package --overwrite Converting simple Python project my_first_project to general Python project. [WARNING] '--overwrite' specified: pre-existing files will be overwritten WITHOUT backup: [WARNING] overwriting /Users/etijskens/software/dev/workspace/ET-dot/docs/index.rstIf you want micc to create a project with a package structure, rather than the default module structure you must append the
--packageflag (or-p) to to themicc createcommand:> micc create my_first_project --package [INFO] [ Creating project (my_first_project): [INFO] Python package (my_first_project): structure = (my_first_project/my_first_project/__init__.py) ... [INFO] ] done.The output of the command clearly shows the package structure.
1.1.2 What’s in a name [intermediate]
The name you choose for your project has many consequences. Ideally, a project name is
- descriptive
- unique
- short
Although one might think of even more requirements, such as being easy to type, satisfying these three is already hard enough. E.g. my_nifty_module may possibly be unique, but it is neither descriptive, neither short. On the other hand, dot_product is descriptive, reasonably short, but probably not unique. Even my_dot_product is probably not unique, and, in addition, confusing to any user that might want to adopt your my_dot_product. A unique name - or at least a name that has not been taken before - becomes really important when you want to publish your code for others to use it. The standard place to publish Python code is the Python Package Index, where you find hundreds of thousands of projects, many of which are really interesting and of high quality. Even if there are only a few colleagues that you want to share your code with, you make their life (as well as yours) easier when you publish your my_nifty_module at PyPI. To install your
my_nifty_modulethey will only need to type:> pip install my_nifty_module(The name my_nifty_module is not used so far, but nevertheless we recommend to choose a better name). Micc will help you publishing your work at PyPI with as little effort as possible, provided your name has not been used sofar. Note that the
micc createcommand has a--publishflag that checks if the name you want to use for your project is still available on PyPI, and, if not, refuses to create the project and asks you to use another name for your project.As there are indeed hundreds of thousands of Python packages published on PyPI, finding a good name has become quite hard. Personally, I often use a simple and short descriptive name, prefixed by my initials,
et-, which generally makes the name unique. It has the advantage that all my published modules are grouped in the PyPI listing.Another point of attention is that although in principle project names can be anything supported by your OS file system, as they are just the name of a directory, micc insists that module and package names comply with the PEP8 module naming rules. Micc derives the package (or module) name from the project name as follows:
- capitals are replaced by lower-case
- hyphens``’-‘`` are replaced by underscores
'_'If the resulting module name is not PEP8 compliant, you get an informative error message:
> micc create 1proj
[ERROR]
The project name (1proj) does not yield a PEP8 compliant module name:"
  The project name must start with char, and contain only chars, digits, hyphens and underscores."
  Alternatively, provide an explicit module name with the --module-name=<name>"
The last line indicates that you can specify an explicit module name, unrelated to the project name. In that case PEP8 compliance is not checked. The responsability then is all yours.
1.2 First steps in micc
1.2.1. The project path in micc
All micc commands accept the global
--project-path=<path>parameter. Global parameters appear before the subcommand name. E.g. the command:> micc --project-path path/to/my_first_project info Project my_first_project located at path/to/my_first_project. package: my_first_project version: 0.0.0 structure: my_first_project.py (Python module)prints some info on the project at
path/to/my_first_project. This can conveniently be abbreviated as:> micc -p path/to/my_first_project infoEven the
createcommand accepts the global--project-path=<path>parameter:> micc -p path/to/my_second_project createwill create project
my_second_projectin the specified location. The command is identical to:> micc create path/to/my_second_projectThe default value for the project path is the current working directory, so:
> micc infowill print info about the project in the current working directory.
Hence, while working on a project, it is convenient to cd into the project directory and execute your micc commands from there, without the the global
--project-path=<path>parameter.This approach works even with the
micc createcommand. If you create an empty directory andcdinto it, you can just runmicc createand it will create the project in the current working directory, taking the project name from the name of the current working directory.
1.2.2 Virtual environments
Virtual environments enable you to quickly set up a Python environment that isolated from the installed Python on your system. In this way you can easily cope with different dependencies between your Python projects.
For a detailed introduction to virtual environments see Python Virtual Environments: A Primer.
When you are developing or using several Python projects it can become difficult for a single Python environment to satisfy all the dependency requirements of these projects simultaneously. Dependencies conflict can easily arise. Python promotes and facilitates code reuse and as a consequence Python tools typically depend on tens to hundreds of other modules. If toolA and toolB both need moduleC, but each requires a different version of it, there is a conflict because it is impossible to install two versions of the same module in a Python environment. The solution that the Python community has come up with for this problem is the construction of virtual environments, which isolates the dependencies of a single project to a single environment.
Creating virtual environments
Since Python 3.3 Python comes with a venv module for the creation of
virtual environments:
> python -m venv my_virtual_environment
This creates a directory my_virtual_environment in the current working directory
which is a complete isolated Python environment. The Python version in this virtual
environment is the same as that of the python command with which the virtual
environment was created. To use this virtual environment you must activate it:
> source my_virtual_environment/bin/activate
(my_virtual_environment) >
Activating a virtual environment modifies the command prompt to remind you constantly that you are working in a virtual environment. The virtual environment is based on the current Python - by preference set by pyenv. If you install new packages, they will be installed in the virtual environment only. The virtual environment can be deactivated by running
(my_virtual_environment) > deactivate
>
Creating virtual environments with Poetry
Poetry uses the above mechanism to manage virtual environment on a per project
basis, and can install all the dependencies of that project, as specified in the
pyproject.toml file, using the install command. Since our project does
not have a virtual environment yet, Poetry creates one, named .venv, and
installs all dependencies in it. We first choose the Python version to use for the
project:
> pyenv local 3.7.5
> python --version
Python 3.7.5
> which python
/Users/etijskens/.pyenv/shims/python
Next, create use poetry to create the virtual environment and install all its
dependencies specified in pyproject.toml:
> poetry install
Creating virtualenv et-dot in /Users/etijskens/software/dev/my_first_project/.venv
Updating dependencies
Resolving dependencies... (0.8s)

Writing lock file


Package operations: 10 installs, 0 updates, 0 removals

  - Installing pyparsing (2.4.5)
  - Installing six (1.13.0)
  - Installing atomicwrites (1.3.0)
  - Installing attrs (19.3.0)
  - Installing more-itertools (7.2.0)
  - Installing packaging (19.2)
  - Installing pluggy (0.13.1)
  - Installing py (1.8.0)
  - Installing wcwidth (0.1.7)
  - Installing pytest (4.6.6)
  - Installing ET-dot (0.0.0)
The installed packages are all dependencies of pytest which we require for testing
our code. The last package is ET-dot itself, which is installed in so-called
development mode. This means that any changes in the source code are immediately
visible in the virtual environment. Adding/removing dependencies is easily achieved
by running poetry add some_module and poetry remove some_other_module.
Consult the poetry_documentation for details
If the virtual environment already exists, or if some virtual environment is activated (not necessarily that of the project itself - be warned), that virtual environment is reused and all installations pertain to that virtual environment.
To use the just created virtual environment of our project, we must activate it:
> source .venv/bin/activate
(.venv)> python --version
Python 3.7.5
(.venv) > which python
/Users/etijskens/software/dev/ET-dot/.venv/bin/python
The location of the virtual environment’s Python and its version are as expected.
Note
Whenever you see a command prompt like (.venv) > the local virtual environment
of the project has been activated. If you want to try yourself, you must activate it too.
To deactivate a script just run deactivate:
(.venv) > deactivate
> which python
/Users/etijskens/.pyenv/shims/python
The (.venv) notice disappears, and the active python is no longer that in the
virtual environment, but the Python specified by pyenv
If something is wrong with a virtual environment, you can simply delete it:
> rm -rf .venv
and create it again. Sometimes it is necessary to delete the poetry.lock as well:
> rm poetry.lock
1.2.3 Modules and scripts
Micc always creates fully functional examples, complete with test code and
documentation, so that you can inspect the files and see as much as
possible how things are supposed to work. The my_first_project/my_first_project.py
module contains a simple hello world method, called hello:
# -*- coding: utf-8 -*-
"""
Package my_first_project
========================

A 'hello world' example.
"""
__version__ = "0.0.0"


def hello(who='world'):
    """'Hello world' method."""
    result = "Hello " + who
    return result
The module can be used right away. Open an interactive Python session and enter the following commands:
> cd path/to/my_first_project
> source .venv/bin/activate
(.venv) > python
Python 3.8.0 (default, Nov 25 2019, 20:09:24)
[Clang 11.0.0 (clang-1100.0.33.12)] on darwin
Type "help", "copyright", "credits" or "license" for more information.
>>> import my_first_project
>>> my_first_project.hello()
'Hello world'
>>> my_first_project.hello("student")
'Hello student'
>>>
Productivity tip
Using an interactive python session to verify that a module does indeed what
you expect is a bit cumbersome. A quicker way is to modify the module so that it
can also behave as a script. Add the following lines to my_first_project/my_first_project.py
at the end of the file:
if __name__=="__main__":
   print(hello())
   print(hello("student"))
and execute it on the command line:
(.venv) > python my_first_project.py
Hello world
Hello student
The body of the if statement is only executed if the file is executed as
a script. When the file is imported, it is ignored.
While working on a single-file project it is sometimes handy to put your tests
the body of if __name__=="__main__":, as below:
if __name__=="__main__":
   assert hello() == "Hello world"
   assert hello("student") == "Hello student"
   print("-*# success #*-")
The last line makes sure that you get a message that all tests went well if they
did, otherwise an AssertionError will be raised.
When you now execute the script, you should see:
(.venv) > python my_first_project.py
-*# success #*-
When you develop your code in an IDE like eclipse+pydev or PyCharm, you can even execute the file without having to leave your editor and switch to a terminal. You can quickly code, test and debug in a single window.
While this is a very productive way of developing, it is a bit on the quick and dirty side. If the module code and the tests become more involved, however,the file will soon become cluttered with test code and a more scalable way to organise your tests is needed. Micc has already taken care of this.
1.2.4 Testing your code
Test driven development is a software development process that relies on the repetition of a very short development cycle: requirements are turned into very specific test cases, then the code is improved so that the tests pass. This is opposed to software development that allows code to be added that is not proven to meet requirements. The advantage of this is clear: the shorter the cycle, the smaller the code that is to be searched for bugs. This allows you to produce correct code faster, and in case you are a beginner, also speeds your learning of Python. Please check Ned Batchelder’s very good introduction to testing with pytest.
When micc creates a new project, or when you add components to an existing project,
it immediately adds a test script for each component in the tests directory.
The test script for the my_first_project module is in file ET-dot/tests/test_my_first_project.py.
Let’s take a look at the relevant section:
# -*- coding: utf-8 -*-
"""Tests for my_first_project package."""

import my_first_project

def test_hello_noargs():
    """Test for my_first_project.hello()."""
    s = my_first_project.hello()
    assert s=="Hello world"

def test_hello_me():
    """Test for my_first_project.hello('me')."""
    s = my_first_project.hello('me')
    assert s=="Hello me"
Tests like this are very useful to ensure that during development the changes to your code do not break things. There are many Python tools for unit testing and test driven development. Here, we use Pytest:
> pytest
=============================== test session starts ===============================
platform darwin -- Python 3.7.4, pytest-4.6.5, py-1.8.0, pluggy-0.13.0
rootdir: /Users/etijskens/software/dev/workspace/foo
collected 2 items

tests/test_foo.py ..                                                        [100%]

============================ 2 passed in 0.05 seconds =============================
The output shows some info about the environment in which we are running the tests,
the current working directory (c.q. the project directory, and the number of tests
it collected (2). Pytest looks for test methods in all test_*.py or
*_test.py files in the current directory and accepts test prefixed methods
outside classes and test prefixed methods inside Test prefixed classes as test
methods to be executed.
Note
Sometimes pytest discovers unintended test files or functions in other directories
than the tests directory, leading to puzzling errors. It is therefore safe
to instruct pytest to look only in the tests directory:
> pytest tests
...
If a test would fail you get a detailed report to help you find the cause of the error and fix it.
Debugging test code
When the report provided by pytest does not yield a clue on the
cause of the failing test, you must use debugging and execute the failing test step
by step to find out what is going wrong where. From the viewpoint of pytest, the
files in the tests directory are modules. Pytest imports them and collects
the test methods, and executes them. Micc also makes every test module executable using
the technique described in 1.2.3 Modules and scripts. At the end of every test file you
will find some extra code:
if __name__ == "__main__":
    the_test_you_want_to_debug = test_hello_noargs

    print("__main__ running", the_test_you_want_to_debug)
    the_test_you_want_to_debug()
    print('-*# finished #*-')
On the first line of the if __name__ == "__main__": body, the variable
the_test_you_want_to_debug is set to the name of some test method in our
test file test_et_dot.py, here test_hello_noargs, which refers to the hello world
that was in the et_dot.py file originally. The variable
the_test_you_want_to_debug is now just another variable pointing to the
very same function object as test_hello_noargs and behaves exactly the
same (see Functions are first class objects).
The next statement prints a start message that tells you that __main__ is running that
test method, after which the test method is called through the the_test_you_want_to_debug
variable, and finally another message is printed to let you know that the script finished.
Here is the output you get when running this test file as a script:
(.venv) > python tests/test_et_dot.py
__main__ running <function test_hello_noargs at 0x1037337a0>
-*# finished #*-
The execution of the test does not produce any output. Now you can use your favourite
Python debugger to execute this script and step into the test_hello_noargs
test method and from there into et_dot.hello to examine if everything goes as
expected. Thus, to debug a failing test, you assign its name to the
the_test_you_want_to_debug variable and debug the script.
1.2.5 Generating documentation [intermediate]
Documentation is extracted from the source code using Sphinx.
It is almost completely generated automatically from the doc-strings in your code. Doc-strings are the
text between triple double quote pairs in the examples above, e.g. """This is a doc-string.""".
Important doc-strings are:
- module doc-strings: at the beginning of the module. Provides an overview of what the module is for.
- class doc-strings: right after the
classstatement: explains what the class is for. (Usually, the doc-string of the __init__ method is put here as well, as dunder methods (starting and ending with a double underscore) are not automatically considered by sphinx. - method doc-strings: right after a
defstatement.
According to pep-0287 the recommended format for Python doc-strings is restructuredText. E.g. a typical method doc-string looks like this:
def hello_world(who='world'):
    """Short (one line) description of the hello_world method.

    A detailed and longer description of the hello_world method.
    blablabla...

    :param str who: an explanation of the who parameter. You should
        mention its default value.
    :returns: a description of what hello_world returns (if relevant).
    :raises: which exceptions are raised under what conditions.
    """
Here, you can find some more examples.
Thus, if you take good care writing doc-strings, helpfule documentation follows automatically.
Micc sets up al the necessary components for documentation generation in sub-directory
et-dot/docs/. There, you find a Makefile that provides a simple interface
to Sphinx. Here is the workflow that is necessary to build the documentation:
> cd path/to/et-dot
> source .venv/bin/activate
(.venv) > cd docs
(.venv) > make html
The last line produces documentation in html format.
Let’s explain the steps
cdinto the project directory:> cd path/to/et-dot >
Activate the project’s virtual environment:
> source .venv/bin/activate
(.venv) >
cdinto the docs subdirectory:(.venv) > cd docs (.venv) >
Here, you will find the
Makefilethat does the work:(.venv) > ls -l total 80 -rw-r--r-- 1 etijskens staff 1871 Dec 10 11:24 Makefile ...
To see a list of possible documentation formats, just run make without arguments:
(.venv) > make
Sphinx v2.2.2
Please use `make target' where target is one of
  html        to make standalone HTML files
  dirhtml     to make HTML files named index.html in directories
  singlehtml  to make a single large HTML file
  pickle      to make pickle files
  json        to make JSON files
  htmlhelp    to make HTML files and an HTML help project
  qthelp      to make HTML files and a qthelp project
  devhelp     to make HTML files and a Devhelp project
  epub        to make an epub
  latex       to make LaTeX files, you can set PAPER=a4 or PAPER=letter
  latexpdf    to make LaTeX and PDF files (default pdflatex)
  latexpdfja  to make LaTeX files and run them through platex/dvipdfmx
  text        to make text files
  man         to make manual pages
  texinfo     to make Texinfo files
  info        to make Texinfo files and run them through makeinfo
  gettext     to make PO message catalogs
  changes     to make an overview of all changed/added/deprecated items
  xml         to make Docutils-native XML files
  pseudoxml   to make pseudoxml-XML files for display purposes
  linkcheck   to check all external links for integrity
  doctest     to run all doctests embedded in the documentation (if enabled)
  coverage    to run coverage check of the documentation (if enabled)
(.venv) >
To build documentation in html format, enter:
(.venv) > make html
...
(.venv) >
This will generation documentation in
et-dot/docs/_build/html. Note that it is essential that this command executes in the project’s virtual environment. You can view the documentation in your favorite browser:(.venv) > open _build/html/index.html # on macosx
or:
(.venv) > xdg-open _build/html/index.html # on ubuntu
(On the cluster the command will fail because it does not have a graphical environment and it cannot run a html-browser.)
Here is a screenshot:
If your expand the API tab on the left, you get to see the
my_first_projectmodule documentation, as it generated from the doc-strings:
To build documentation in .pdf format, enter:
(.venv) > make latexpdf
This will generation documentation in :file:et-dot/docs/_build/latex/et-dot.pdf`. Note that it is essential that this command executes in the project’s virtual environment. You can view it in your favorite pdf viewer:
(.venv) > open _build/latex/et-dot.pdf # on macosx
or:
(.venv) > xdg-open _build/latex/et-dot.pdf # on ubuntu
Note
When building documentation by running the docs/Makefile, it is
verified that the correct virtual environment is activated, and that the needed
Python modules are installed in that environment. If not, they are first installed
using pip install. These components are not becoming dependencies of the project.
If needed you can add dependencies using the poetry add command.
The boilerplate code for documentation generation is in the docs directory, just as
if it were generated by hand using sphinx-quickstart. (In fact, it was generated using
sphinx-quickstart, but then turned into a
Cookiecutter template.)
those files is not recommended, and only rarely needed. Then there are a number
of .rst files with capitalized names in the project directory:
README.rstis assumed to contain an overview of the project,API.rstdescribes the classes and methods of the project in detail,APPS.rstdescribes command line interfaces or apps added to your project.AUTHORS.rstlist the contributors to the projectHISTORY.rstwhich should describe the changes that were made to the code.
The .rst extenstion stands for reStructuredText. It iss a simple and concise
approach to text formatting.
If you add components to your project through micc, care is taken that the
.rst files in the project directory and the docs directory are
modified as necessary, so that sphinx is able find the doc-strings. Even for
command line interfaces (CLI, or console scripts) based on
click the documentation is generated
neatly from the help strings of options and the doc-strings of the commands.
1.2.6 Version control [advanced]
Although version control is extremely important for any software project with a lifetime of more a day, we mark it as an advanced topic as it does not affect the development itself. Micc facilitates version control by automatically creating a local git repository in your project directory. If you do not want to use it, you may ignore it or even delete it.
Git is a version control system that solves many practical problems related to the process software development, independent of whether your are the only developer, or there is an entire team working on it from different places in the world. You find more information about how micc uses git in Tutorial 4.
Let’s take a close look at the output of the
micc create my_first_projectcommand. The first line tells us that a project directory is being created:[INFO] [ Creating project (my_first_project):The next line explains the structure of the project, module or package:
[INFO] Python module (my_first_project): structure = (my_first_project/my_first_project.py)Next we are informed that a local git repository is being created:
[INFO] [ Creating git repositoryMicc tries to push this local repository to a remote repository at https://github.com/yourgitaccount. If you did not create a remote git repository on beforehand, this gives rise to some warnings:
[WARNING]                    > git push -u origin master
[WARNING]                    (stderr)
                             remote: Repository not found.
                             fatal: repository 'https://github.com/yourgitaccount/my_first_project/' not found
Micc is unable to push the local repo to github, if the remote repo does not exist. The local repo is for many purposes sufficient, but the remote repo enables sharing your work with others and provides a backup of your work.
Finally, micc informs us that the tasks are finished.
[INFO] ] done. [INFO] ] done. >Note that the name of the remote git repo is the project name, not the module name.
1.3 Miscellaneous
1.3.1 The license file [intermediate]
The project directory contains a LICENCE file, a text file
describing the licence applicable to your project. You can choose between
- MIT license (default),
- BSD license,
- ISC license,
- Apache Software License 2.0,
- GNU General Public License v3 and
- Not open source.
MIT license is a very liberal license and the default option. If you’re unsure which license to choose, you can use resources such as GitHub’s Choose a License
You can select the license file when you create the project:
> cd some_empty_dir
> micc create --license BSD
Of course, the project depends in no way on the license file, so it can be replaced manually at any time by the license you desire.
1.3.2 The Pyproject.toml file [intermediate]
The file pyproject.toml (located in the project directory) is the
modern way to describe the build system requirements of the project:
PEP 518. Although most of
this file’s content is generated automatically by micc and poetry some
understanding of it is useful, consult https://poetry.eustace.io/docs/pyproject/.
The pyproject.toml file is rather human-readable:
> cat pyproject.toml
[tool.poetry]
name = "ET-dot"
version = "1.0.0"
description = "<Enter a one-sentence description of this project here.>"
authors = ["Engelbert Tijskens <engelbert.tijskens@uantwerpen.be>"]
license = "MIT"

readme = 'README.rst'

repository = "https://github.com/etijskens/ET-dot"
homepage = "https://github.com/etijskens/ET-dot"

keywords = ['packaging', 'poetry']

[tool.poetry.dependencies]
python = "^3.7"
et-micc-build = "^0.10.10"

[tool.poetry.dev-dependencies]
pytest = "^4.4.2"

[tool.poetry.scripts]

[build-system]
requires = ["poetry>=0.12"]
build-backend = "poetry.masonry.api"
1.3.3 The log file Micc.log [intermediate]
The project directory also contains a log file micc.log. All micc commands
that modify the state of the project leave a trace in this file, So you can look up
what happened when to your project. Should you think that the log file has become
too big, or just useless, you can delete it manually, or add the --clear-log flag
before any micc subcommand, to remove it. If the subcommand alters the state of the
project, the log file will only contain the log messages from the last subcommand.
> ll micc.log
-rw-r--r--  1 etijskens  staff  34 Oct 10 20:37 micc.log

> micc --clear-log info
Project bar located at /Users/etijskens/software/dev/workspace/bar
  package: bar
  version: 0.0.0
  structure: bar.py (Python module)

> ll micc.log
ls: micc.log: No such file or directory
1.3.4 Adjusting micc to your needs [advanced]
Micc is based on a series of additive Cookiecutter templates which generate the
boilerplate code. If you like, you can tweak these templates in the
site-packages/et_micc/templates directory of your micc installation. When you
pipx installed micc, that is typically something like:
~/.local/pipx/venvs/et-micc/lib/pythonX.Y/site-packages/et_micc,
where :file`pythonX.Y` is the python version you installed micc with.
1.4 A first real project
Let’s start with a simple problem: a Python module that computes the scalar product of two arrays, generally referred to as the dot product. Admittedly, this not a very rewarding goal, as there are already many Python packages, e.g. Numpy, that solve this problem in an elegant and efficient way. However, because the dot product is such a simple concept in linear algebra, it allows us to illustrate the usefulness of Python as a language for High Performance Computing, as well as the capabilities of Micc.
First, set up a new project for this dot project, which i named ET-dot, ET being my initials. Not knowing beforehand how involved this project will become, we create a simple module project:
> micc -p ET-dot create
[INFO]           [ Creating project (ET-dot):
[INFO]               Python module (my_first_project): structure = (ET-dot/et_dot.py
[INFO]               [ Creating git repository
[WARNING]                    > git push -u origin master
[WARNING]                    (stderr)
                             remote: Repository not found.
                             fatal: repository 'https://github.com/etijskens/ET-dot/' not found
[INFO]               ] done.
[WARNING]            Run 'poetry install' in the project directory to create a virtual environment and install its dependencies.
[INFO]           ] done.
> cd ET-dot
As the output shows the module name is converted from the project name and made compliant with the PEP8 module naming rules: et_dot. Next, we create a virtual environment for the project with all the standard micc dependencies:
> poetry install
Creating virtualenv et-dot in /Users/etijskens/software/dev/workspace/tmp/ET-dot/.venv
Updating dependencies
Resolving dependencies... (0.8s)

Writing lock file


Package operations: 10 installs, 0 updates, 0 removals

  - Installing pyparsing (2.4.5)
  - Installing six (1.13.0)
  - Installing atomicwrites (1.3.0)
  - Installing attrs (19.3.0)
  - Installing more-itertools (8.0.2)
  - Installing packaging (19.2)
  - Installing pluggy (0.13.1)
  - Installing py (1.8.0)
  - Installing wcwidth (0.1.7)
  - Installing pytest (4.6.7)
  - Installing ET-dot (0.0.0)
>
Next, activate the virtual environment:
> source .venv/bin/activate (.venv) >
Open module file et_dot.py in your favourite editor and code a dot product
method (naievely) as follows:
# -*- coding: utf-8 -*-
"""
Package et_dot
==============
Python module for computing the dot product of two arrays.
"""
__version__ = "0.0.0"

def dot(a,b):
    """Compute the dot product of *a* and *b*.

    :param a: a 1D array.
    :param b: a 1D array of the same length as *a*.
    :returns: the dot product of *a* and *b*.
    :raises: ArithmeticError if ``len(a)!=len(b)``.
    """
    n = len(a)
    if len(b)!=n:
        raise ArithmeticError("dot(a,b) requires len(a)==len(b).")
    d = 0
    for i in range(n):
        d += a[i]*b[i]
    return d
We defined a dot() method with an informative doc-string that describes
the parameters, the return value and the kind of exceptions it may raise.
We could use the dot method in a script as follows:
from et_dot import dot

a = [1,2,3]
b = [4.1,4.2,4.3]
a_dot_b = dot(a,b)
Note
This dot product implementation is naive for many reasons:
- Python is very slow at executing loops, as compared to Fortran or C++.
- The objects we are passing in are plain Python
list`s. A :py:obj:`listis a very powerfull data structure, with array-like properties, but it is not exactly an array. Alistis in fact an array of pointers to Python objects, and therefor list elements can reference anything, not just a numeric value as we would expect from an array. With elements being pointers, looping over the array elements implies non-contiguous memory access, another source of inefficiency. - The dot product is a subject of Linear Algebra. Many excellent libraries have been designed for this purpose. Numpy should be your starting point because it is well integrated with many other Python packages. There is also Eigen a C++ library for linear algebra that is neatly exposed to Python by pybind11.
In order to verify that our implementation of the dot product is correct, we write a
test. For this we open the file tests/test_et_dot.py. Remove the original tests,
and add a new one:
import et_dot

def test_dot_aa():
    a = [1,2,3]
    expected = 14
    result = et_dot.dot(a,a)
    assert result==expected
Save the file, and run the test. Pytest will show a line for every test source file.
On each such line a . will appear for every successfull test, and a F for a
failing test.
(.venv) > pytest
=============================== test session starts ===============================
platform darwin -- Python 3.7.4, pytest-4.6.5, py-1.8.0, pluggy-0.13.0
rootdir: /Users/etijskens/software/dev/workspace/ET-dot
collected 1 item

tests/test_et_dot.py .                                                      [100%]

============================ 1 passed in 0.08 seconds =============================
(.venv) >
Note
If the project’s virtual environment is not activated, the command pytest
will generally not be found.
Great! our test succeeded. Let’s increment the project’s version (-p is short for --patch,
and requests incrementing the patch component of the version string):
(.venv) > micc version -p
[INFO]           (ET-dot)> micc version (0.0.0) -> (0.0.1)
Obviously, our test tests only one particular case. A clever way of testing is to focus on properties. From mathematics we now that the dot product is commutative. Let’s add a test for that.
import random

def test_dot_commutative():
    # create two arrays of length 10 with random float numbers:
    a = []
    b = []
    for _ in range(10):
        a.append(random.random())
        b.append(random.random())
    # do the test
    ab = et_dot.dot(a,b)
    ba = et_dot.dot(b,a)
    assert ab==ba
You can easily verify that this test works too. We increment the version string again:
(.venv) > micc version -p
[INFO]           (ET-dot)> micc version (0.0.1) -> (0.0.2)
There is however a risk in using arrays of random numbers. Maybe we were just lucky and got random numbers that satisfy the test by accident. Also the test is not reproducible anymore. The next time we run pytest we will get other random numbers, and may be the test will fail. That would represent a serious problem: since we cannot reproduce the failing test, we have no way finding out what went wrong. For random numbers we can fix the seed at the beginning of the test. Random number generators are deterministic, so fixing the seed makes the code reproducible. To increase coverage we put a loop around the test.
def test_dot_commutative_2():
    # Fix the seed for the random number generator of module random.
    random.seed(0)
    # choose array size
    n = 10
    # create two arrays of length n with with zeros:
    a = n * [0]
    b = n * [0]
    # repetion loop:
    for r in range(1000):
        # fill a and b with random float numbers:
        for i in range(n):
            a[i] = random.random()
            b[i] = random.random()
        # do the test
        ab = et_dot.dot(a,b)
        ba = et_dot.dot(b,a)
        assert ab==ba
Again the test works. Another property of the dot product is that the dot product with a zero vector is zero.
def test_dot_zero():
    # Fix the seed for the random number generator of module random.
    random.seed(0)
    # choose array size
    n = 10
    # create two arrays of length n with with zeros:
    a = n * [0]
    zero = n * [0]
    # repetion loop (the underscore is a placeholder for a variable dat we do not use):
    for _ in range(1000):
        # fill a with random float numbers:
        for i in range(n):
            a[i] = random.random()
        # do the test
        azero = et_dot.dot(a,zero)
        assert azero==0
This test works too. Furthermore, the dot product with a vector of ones is the sum of the elements of the other vector:
def test_dot_one():
    # Fix the seed for the random number generator of module random.
    random.seed(0)
    # choose array size
    n = 10
    # create two arrays of length n with with zeros:
    a = n * [0]
    one = n * [1.0]
    # repetion loop (the underscore is a placeholder for a variable dat we do not use):
    for _ in range(1000):
        # fill a with random float numbers:
        for i in range(n):
            a[i] = random.random()
        # do the test
        aone = et_dot.dot(a,one)
        expected = sum(a)
        assert aone==expected
Success again. We are getting quite confident in the correctness of our implementation. Here is another test:
def test_dot_one_2():
    a1 = 1.0e16
    a   = [a1 ,1.0,-a1]
    one = [1.0,1.0,1.0]
    expected = 1.0
    result = et_dot.dot(a,one)
    assert result==expected
Clearly, it is a special case of the test above the expected result is the sum of the elements
in a, that is 1.0. Yet it - unexpectedly - fails. Fortunately pytest produces a readable
report about the failure:
> pytest
================================= test session starts ==================================
platform darwin -- Python 3.7.4, pytest-4.6.5, py-1.8.0, pluggy-0.13.0
rootdir: /Users/etijskens/software/dev/workspace/ET-dot
collected 6 items

tests/test_et_dot.py .....F                                                      [100%]

======================================= FAILURES =======================================
____________________________________ test_dot_one_2 ____________________________________

    def test_dot_one_2():
        a1 = 1.0e16
        a   = [a1 , 1.0, -a1]
        one = [1.0, 1.0, 1.0]
        expected = 1.0
        result = et_dot.dot(a,one)
>       assert result==expected
E       assert 0.0 == 1.0

tests/test_et_dot.py:91: AssertionError
========================== 1 failed, 5 passed in 0.17 seconds ==========================
>
Mathematically, our expectations about the outcome of the test are certainly correct. Yet,
pytest tells us it found that the result is 0.0 rather than 1.0. What could possibly
be wrong? Well our mathematical expectations are based on our - false - assumption that the
elements of a are real numbers, most of which in decimal representation are characterised
by an infinite number of digits. Computer memory being finite, however, Python (and for that
matter all other programming languages) uses a finite number of bits to approximate real
numbers. These numbers are called floating point numbers and their arithmetic is called
floating point arithmetic. Floating point arithmetic has quite different properties than
real number arithmetic. A floating point number in Python uses 64 bits which yields
approximately 15 representable digits. Observe the consequences of this in the Python statements
below:
>>> 1.0 + 1e16
1e+16
>>> 1e16 + 1.0 == 1e16
True
>>> 1.0 + 1e16 == 1e16
True
>>> 1e16 + 1.0 - 1e16
0.0
There are several lessons to be learned from this:
- The test does not fail because our code is wrong, but because our mind is used to reasoning
about real number arithmetic, rather than floating point arithmetic rules. As the latter
is subject to round-off errors, tests sometimes fail unexpectedly. Note that for comparing
floating point numbers the the standard library provides a
math.isclose()method. - Another silent assumption by which we can be mislead is in the random numbers. In fact,
random.random()generates pseudo-random numbers in the interval ``[0,1[``, which is quite a bit smaller than]-inf,+inf[. No matter how often we run the test the special case above that fails will never be encountered, which may lead to unwarranted confidence in the code.
So, how do we cope with the failing test? Here is a way using math.isclose():
import math

def test_dot_one_2():
    a1 = 1.0e16
    a   = [a1 , 1.0, -a1]
    one = [1.0, 1.0, 1.0]
    expected = 1.0
    result = et_dot.dot(a,one)
    # assert result==expected
    assert math.isclose(result, expected, abs_tol=10.0)
This is a reasonable solution if we accept that when dealing with numbers as big as 1e19,
an absolute difference of 10 is negligible.
Another aspect that should be tested is the behavior of the code in exceptional circumstances.
Does it indeed raise ArithmeticError if the arguments are not of the same length?
Here is a test:
import pytest

def test_dot_unequal_length():
    a = [1,2]
    b = [1,2,3]
    with pytest.raises(ArithmeticError):
        et_dot.dot(a,b)
Here, pytest.raises() is a context manager that will verify that ArithmeticError
is raise when its body is executed.
Note
A detailed explanation about context managers see https://jeffknupp.com/blog/2016/03/07/python-with-context-managers//
Note that you can easily make et_dot.dot() raise other
exceptions, e.g. TypeError by passing in arrays of non-numeric types:
>>> et_dot.dot([1,2],[1,'two'])
Traceback (most recent call last):
  File "<stdin>", line 1, in <module>
  File "/Users/etijskens/software/dev/workspace/ET-dot/et_dot.py", line 23, in dot
    d += a[i]*b[i]
TypeError: unsupported operand type(s) for +=: 'int' and 'str'
>>>
Note that it is not the product a[i]*b[i] for i=1 that is wreaking havoc, but
the addition of its result to d.
At this point you might notice that even for a very simple and well defined function
as the dot product the amount of test code easily exceeds the amount of tested code
by a factor of 5 or more. This is not at all uncommon. As the tested code here is an
isolated piece of code, you will probably leave it alone as soon as it passes the tests
and you are confident in the solution. If at some point, the dot() would fail
you should write a test that reproduces the error and improve the solution so that it
passes the test.
When constructing software for more complex problems, there will very soon be many interacting components and running the tests after modifying one of the components will help you assure that all components still play well together, and spot problems as soon as possible.
At this point we want to produce a git tag of the project:
(.venv) > micc tag
[INFO] Creating git tag v0.0.7 for project ET-dot
[INFO] Done.
The tag is a label for the current code base of our project.
1.3 Improving efficiency
There are times when a correct solution - i.e. a code that solves the problem correctly - is sufficient. Very often, however, there are constraints on the time to solution, and the computing resources (number of cores and nodes, memory, ..) are requested to be used efficiently. Especially in scientific computing and high performance computing, where compute tasks may run for many days using hundreds of compute nodes and resources are to be shared with many researchers, using the resources efficiently is of utmost importance.
However important efficiency may be, it is nevertheless a good strategy for developing a new piece of code, to start out with a simple, even naive implementation in Python, neglecting all efficiency considerations, but focussing on correctness. Python has a reputation of being an extremely productive programming language. Once you have proven the correctness of this first version it can serve as a reference solution to verify the correctness of later efficiency improvements. In addition, the analysis of this version can highlight the sources of inefficiency and help you focus your attention to the parts that really need it.
Timing your code
The simplest way to probe the efficiency of your code is to time it: write a simple script and record how long it takes to execute. Let us first look at the structure of a Python script.
Here’s a script (using the above structure) that computes the dot product of two long arrays of random numbers.
"""file et_dot/prof/run1.py"""
import random
from et_dot import dot

def random_array(n=1000):
    """Initialize an array with n random numbers in [0,1[."""
    # Below we use a list comprehension (a Python idiom for creating a list from an iterable object).
    a = [random.random() for i in range(n)]
    return a

if __name__=='__main__':
    a = random_array()
    b = random_array()
    print(dot(a,b))
    print('-*# done #*-')
We store this file, which we rather simply called run1.py, in a directory prof
in the project directory where we intend to keep all our profiling work.
You can execute the script from the command line (with the project directory as the current
working directory:
(.venv) > python ./prof/run1.py
251.08238559724717
-*# done #*-
Note
As our script does not fix the random number seed, every run has a different outcome.
We are now ready to time our script. There are many ways to achieve this. Here is a particularly good introduction. The et-stopwatch project takes this a little further. We add it as a development dependency of our project:
(.venv) > poetry add et_stopwatch -D
Using version ^0.3.0 for et_stopwatch
Updating dependencies
Resolving dependencies... (0.2s)
Writing lock file
Package operations: 1 install, 0 updates, 0 removals
  - Installing et-stopwatch (0.3.0)
(.venv) >
Note
A development dependency is a package that is not needed for using the package at hand, bit only needed for developing it.
Using the Stopwatch class to time pieces of code is simple:
"""file et_dot/prof/run1.py"""
from et_stopwatch import Stopwatch

...

if __name__=='__main__':
    with Stopwatch(message="init"):
        a = random_array()
        b = random_array()
    with Stopwatch(message="dot "):
        dot(a,b)
    print('-*# done #*-')
When the script is exectuted the two print statements will print the duration of the
initalisation of a and b and of the computation of the dot product of a and b.
Finally, upon exit the Stopwatch will print the total time.
(.venv) > python ./prof/run1.py
init: 0.000281 s
dot : 0.000174 s
-*# done #*-
>
Note that the initialization phase took longer than the computation. Random number generation is rather expensive.
Comparing to Numpy
As said earlier, our implementation of the dot product is rather naive. If you want
to become a good programmer, you should understand that you are probably not the
first researcher in need of a dot product implementation. For most linear algebra
problems, Numpy provides very efficient implementations.
Below the run1.py script adds timing results for the Numpy equivalent of
our code.
"""file et_dot/prof/run1.py"""
import numpy as np

...

if __name__=='__main__':
    with Stopwatch(name="et init"):
        a = random_array()
        b = random_array()
    with Stopwatch(name="et dot "):
        dot(a,b)

    with Stopwatch(name="np init"):
        a = np.random.rand(1000)
        b = np.random.rand(1000)
    with Stopwatch(name="np dot "):
        np.dot(a,b)

    print('-*# done #*-')
Obviously, to run this script, we must first install Numpy (again as a development dependency):
(.venv) > poetry add numpy -D
Using version ^1.18.1 for numpy
Updating dependencies
Resolving dependencies... (1.5s)
Writing lock file
Package operations: 1 install, 0 updates, 0 removals
  - Installing numpy (1.18.1)
(.venv) >
Here are the results of the modified script:
(.venv) > python ./prof/run1.py
et init: 0.000252 s
et dot : 0.000219 s
np init: 7.8e-05 s
np dot : 3.2e-05 s
-*# done #*-
>
Obviously, Numpy does significantly better than our naive dot product implementation. The reasons for this improvement are:
- Numpy arrays are contiguous data structures of floating point numbers, unlike Python’s
list. Contiguous memory access is far more efficient. - The loop over Numpy arrays is implemented in a low-level programming languange. This allows to make full use of the processors hardware features, such as vectorization and fused multiply-add (FMA).
Conclusion
There are three important generic lessons to be learned from this tutorial:
- Always start your projects with a simple and straightforward implementation which can be easily be proven to be correct. Write test code for proving correctness.
- Time your code to understand which parts are time consuming and which not. Optimize bottlenecks first and do not waste time optimizing code that does not contribute significantly to the total runtime. Optimized code is typically harder to read and may become a maintenance issue.
- Before you write code, in this case our dot product implementation, spent some time searching the internet to see what is already available. Especially in the field of scientific and high performance computing there are many excellent libraries available which are hard to beat. Use your precious time for new stuff.
Tutorial 2: Binary extensions
Suppose for a moment that Numpy did not have a dot product implementation and that the implementation provided in Tutorial-1 is way too slow to be practical for your research project. Consequently, you are forced to accelarate your dot product code in some way or another. There are several approaches for this. Here are a number of interesting links covering them:
- Why you should use Python for scientific research
- Performance Python: Seven Strategies for Optimizing Your Numerical Code
- High performance Python 1
- High performance Python 2
- High performance Python 3
- High performance Python 4
Most of these approaches do not require special support from Micc to get you going, and we encourage you to go try out the High Performance Python series 1-3 for the ET-dot project. Two of the approaches discussed involve rewriting your code in Modern Fortran or C++ and generate a shared library that can be imported in Python just as any Python module. Such shared libraries are called binary extension modules. Constructing binary extension modules is by far the most scalable and flexible of all current acceleration strategies, as these languages are designed to squeeze the maximum of performance out of a CPU. However, figuring out how to make this work is a bit of a challenge, especially in the case of C++.
This is in fact one of the main reasons why Micc was designed: facilitating the construction of binary extension modules and enabling the developer to create high performance tools with ease.
2.1 Binary extensions in Micc projects
Micc provides boilerplate code for binary extensions as well as some practical wrappers around top-notch tools for building binary extensions from Fortran and C++. Fortran code is compiled into a Python module using f2py (which comes with Numpy). For C++ we use Pybind11 and CMake.
Adding a binary extension is as simple as:
> micc add foo --f90   # add a binary extension 'foo' written in (Modern) Fortran
> micc add bar --cpp   # add a binary extension 'bar' written in C++
Note
For the micc add command to be valid, your project must have a package
structure (see `Modules and packages`_).
Enter your own code in the generated source code files and execute :
(.venv) > micc-build
Note
The virtual environment must be activated to execute the micc-build
command (see `Virtual environments`_).
If there are no syntax errors your binary extensions will be built, and you
will be able to import the modules foo and bar in your
project and use their subroutines and functions. Because foo and
bar are submodules of your micc project, you must import them as:
import my_package.foo
import my_package.bar

# call foofun in my_package.foo
my_package.foo.foofun(...)

# call barfun in my_package.bar
my_package.bar.barfun(...)
where my_package is the name of the top package of your micc project.
Choosing between Fortran and C++ for binary extension modules
Here are a number of arguments that you may wish to take into account for choosing the programming language for your binary extension modules:
- Fortran is a simpler language than C++
- It is easier to write efficient code in Fortran than C++.
- C++ is a much more expressive language
- C++ comes with a huge standard library, providing lots of data structures and algorithms that are hard to match in Fortran. If the standard library is not enough, there is also the highly recommended Boost libraries and many other domain specific libraries. There are also domain specific libraries in Fortran, but the amount differs by an order of magnitude at least.
- With Pybind11 you can almost expose anything from the C++ side to Python, not just functions.
- Modern Fortran is (imho) not as good documented as C++. Useful place to look for language features and idioms are:
In short, C++ provides much more possibilities, but it is not for the novice. As to my own experience, I discovered that working on projects of moderate complexity I progressed significantly faster using Fortran rather than C++, despite the fact that my knowledge of Fortran is quite limited compared to C++. However, your mileage may vary.
2.2 Building binary extensions from Fortran
Binary extension modules based on Fortran are called f90 modules. Micc uses the f2py tool to build these binary extension modules from Fortran. F2py is part of Numpy.
Note
To be able to add a binary extension module (as well as any other component supported
by micc, such as Python modules or CLI applications) to a micc project, your project
must have a package structure. This is easily checked by running the micc info command:
> micc info
Project ET-dot located at /home/bert/software/workspace/ET-dot
  package: et_dot
  version: 0.0.0
  structure: et_dot/__init__.py (Python package)
>
If it does, the structure line of the output will read as above. If, however, the structure line reads:
structure: et_dot.py (Python module)
you should convert it by running:
> micc convert-to-package --overwrite
See `Modules and packages`_ for details.
We are now ready to create a f90 module for a Fortran implementation fof the
dot product, say dotf, where the f, obviously, stands for Fortran:
> micc add dotf --f90
[INFO]           [ Adding f90 module dotf to project ET-dot.
[INFO]               - Fortran source in       ET-dot/et_dot/f90_dotf/dotf.f90.
[INFO]               - Python test code in     ET-dot/tests/test_f90_dotf.py.
[INFO]               - module documentation in ET-dot/et_dot/f90_dotf/dotf.rst (in restructuredText format).
[WARNING]            Dependencies added. Run \'poetry update\' to update the project\'s virtual environment.
[INFO]           ] done.
The output tells us where to enter the Fortran source code, the test code and the documentation.
Enter the Fortran implementation of the dot product below in the Fortran source file
ET-dot/et_dot/f90_dotf/dotf.f90 (using your favourite editor or an IDE):
function dotf(a,b,n)
  ! Compute the dot product of a and b
  !
    implicit none
  !-------------------------------------------------------------------------------------------------
    integer*4              , intent(in)    :: n
    real*8   , dimension(n), intent(in)    :: a,b
    real*8                                 :: dotf
  !-------------------------------------------------------------------------------------------------
  ! declare local variables
    integer*4 :: i
  !-------------------------------------------------------------------------------------------------
    dotf = 0.
    do i=1,n
        dotf = dotf + a(i) * b(i)
    end do
end function dotf
The output of the micc add dotf --f90 command above also shows a warning:
[WARNING] Dependencies added. Run `poetry update` to update the project's virtual environment.
Micc is telling you that it added some dependencies to your project. In order to be able to build the binary
extension dotf these dependencies must be installed in the virtual environment of our project by running
poetry update.
> poetry update
Updating dependencies
Resolving dependencies... (2.5s)

Writing lock file


Package operations: 40 installs, 0 updates, 0 removals

  - Installing certifi (2019.11.28)
  - Installing chardet (3.0.4)
  - Installing idna (2.8)
  - Installing markupsafe (1.1.1)
  - Installing python-dateutil (2.8.1)
  - Installing pytz (2019.3)
  - Installing urllib3 (1.25.7)
  - Installing alabaster (0.7.12)
  - Installing arrow (0.15.4)
  - Installing babel (2.7.0)
  - Installing docutils (0.15.2)
  - Installing imagesize (1.1.0)
  - Installing jinja2 (2.10.3)
  - Installing pygments (2.5.2)
  - Installing requests (2.22.0)
  - Installing snowballstemmer (2.0.0)
  - Installing sphinxcontrib-applehelp (1.0.1)
  - Installing sphinxcontrib-devhelp (1.0.1)
  - Installing sphinxcontrib-htmlhelp (1.0.2)
  - Installing sphinxcontrib-jsmath (1.0.1)
  - Installing sphinxcontrib-qthelp (1.0.2)
  - Installing sphinxcontrib-serializinghtml (1.1.3)
  - Installing binaryornot (0.4.4)
  - Installing click (7.0)
  - Installing future (0.18.2)
  - Installing jinja2-time (0.2.0)
  - Installing pbr (5.4.4)
  - Installing poyo (0.5.0)
  - Installing sphinx (2.2.2)
  - Installing whichcraft (0.6.1)
  - Installing cookiecutter (1.6.0)
  - Installing semantic-version (2.8.3)
  - Installing sphinx-click (2.3.1)
  - Installing sphinx-rtd-theme (0.4.3)
  - Installing tomlkit (0.5.8)
  - Installing walkdir (0.4.1)
  - Installing et-micc (0.10.10)
  - Installing numpy (1.17.4)
  - Installing pybind11 (2.4.3)
  - Installing et-micc-build (0.10.10)
Note from the last lines in the output that micc-build,
which is a companion of Micc that encapsulates the machinery that does the hard work of building the
binary extensions, depends on pybind11, Numpy, and on micc itself. As a consaequence, micc is now
also installed in the projects virtual environment. Therefore, when the project’s virtual environment
is activated, the active micc is the one in the project’s virtual environment:
> source .venv/bin/activate
(.venv) > which micc
path/to/ET-dot/.venv/bin/micc
(.venv) >
We might want to increment the minor component of the version string by now:
(.venv) > micc version -m
[INFO]           (ET-dot)> micc version (0.0.7) -> (0.1.0)
The binary extension module can now be built:
(.venv) > micc-build
[INFO] [ Building f90 module dotf in directory '/Users/etijskens/software/dev/workspace/ET-dot/et_dot/f90_dotf/build_'
...
[DEBUG]          >>> shutil.copyfile( 'dotf.cpython-37m-darwin.so', '/Users/etijskens/software/dev/workspace/ET-dot/et_dot/dotf.cpython-37m-darwin.so' )
[INFO] ] done.
[INFO] Check /Users/etijskens/software/dev/workspace/ET-dot/micc-build-f90_dotf.log for details.
[INFO] Binary extensions built successfully:
[INFO] - ET-dot/et_dot/dotf.cpython-37m-darwin.so
(.venv) >
This command produces a lot of output, most of which is rather uninteresting - except in the
case of errors. At the end is a summary of all binary extensions that have been built, or
failed to build. If the source file does not have any syntax errors, you will see a file like
dotf.cpython-37m-darwin.so in directory ET-dot/et_dot:
(.venv) > ls -l et_dot
total 8
-rw-r--r--  1 etijskens  staff  720 Dec 13 11:04 __init__.py
drwxr-xr-x  6 etijskens  staff  192 Dec 13 11:12 f90_dotf/
lrwxr-xr-x  1 etijskens  staff   92 Dec 13 11:12 dotf.cpython-37m-darwin.so@ -> path/to/ET-dot/et_dot/f90_foo/foo.cpython-37m-darwin.so
Note
The extension of the module dotf.cpython-37m-darwin.so will depend on the Python
version (c.q. 3.7) you are using, and on your operating system (c.q. MacOS).
Since our binary extension is built, we can test it. Here is some test code. Enter it in file
ET-dot/tests/test_f90_dotf.py:
# import the binary extension and rename the module locally as f90
import et_dot.dotf as f90
import numpy as np

def test_dotf_aa():
    a = np.array([0,1,2,3,4],dtype=np.float)
    expected = np.dot(a,a)
    a_dotf_a = f90.dotf(a,a)
    assert a_dotf_a==expected
The astute reader will notice the magic that is happening here: a is a numpy array,
which is passed as is to our et_dot.dotf.dotf() function in our binary extension.
An invisible wrapper function will check the types of the numpy arrays, retrieve pointers
to the memory of the numpy arrays and feed those pointers into our Fortran function, the
result of which is stored in a Python variable a_dotf_a. If you look carefully
at the output of ``micc-build`, you will see information about the wrappers that f2py
constructed.
Passing Numpy arrays directly to Fortran routines is extremely productive. Many useful Python packages use numpy for arrays, vectors, matrices, linear algebra, etc. By being able to pass Numpy arrays directly into your own number crunching routines relieves you from conversion between array types. In addition you can do the memory management of your arrays and their initialization in Python.
As you can see we test the outcome of dotf against the outcome of numpy.dot().
We thrust that outcome, but beware that this test may be susceptible to round-off error
because the representation of floating point numbers in Numpy and in Fortran may differ
slightly.
Here is the outcome of pytest:
> pytest
================================ test session starts =================================
platform darwin -- Python 3.7.4, pytest-4.6.5, py-1.8.0, pluggy-0.13.0
rootdir: /Users/etijskens/software/dev/workspace/ET-dot
collected 8 items

tests/test_et_dot.py .......                                                   [ 87%]
tests/test_f90_dotf.py .                                                       [100%]

============================== 8 passed in 0.16 seconds ==============================
>
All our tests passed. Of course we can extend the tests in the same way as we did for the naive Python implementation in the previous tutorial. We leave that as an exercise to the reader.
Increment the version string and produce tag:
(.venv) > micc version -p -t
[INFO]           (ET-dot)> micc version (0.1.0) -> (0.1.1)
[INFO]           Creating git tag v0.1.1 for project ET-dot
[INFO]           Done.
Note
If you put your subroutines and functions inside a Fortran module, as in:
MODULE my_f90_module
  implicit none
  contains
    function dot(a,b)
      ...
    end function dot
END MODULE my_f90_module
then the binary extension module will expose the Fortran module name my_f90_module
which in turn exposes the function/subroutine names:
>>> import et_dot
>>> a = [1.,2.,3.]
>>> b = [2.,2.,2.]
>>> et_dot.dot(a,b)
>>> AttributeError
Module et_dot has no attribute 'dot'.
>>> et_dot.my_F90_module.dot(a,b)
12.0
If you are bothered by having to type et_dot.my_F90_module. every time, use this trick:
>>> import et_dot
>>> f90 = et_dot.my_F90_module
>>> f90.dot(a,b)
12.0
>>> fdot = et_dot.my_F90_module.dot
>>> fdot(a,b)
12.0
2.3 Building binary extensions from C++
To illustrate building binary extension modules from C++ code, let us also create a
C++ implementation for the dot product. Such modules are called cpp modules.
Analogously to our dotf module we will call the cpp module dotc,
the c referring to C++.
Note
To add binary extension modules to a project, it must have a package structure.
To check, you may run the micc info command and verify the structure line.
If it mentions Python module, you must convert the structure by running
micc convert-to-package --overwrite. See `Modules and packages`_ for details.
Use the micc add command to add a cpp module:
> micc add dotc --cpp
[INFO]           [ Adding cpp module dotc to project ET-dot.
[INFO]               - C++ source in           ET-dot/et_dot/cpp_dotc/dotc.cpp.
[INFO]               - module documentation in ET-dot/et_dot/cpp_dotc/dotc.rst (in restructuredText format).
[INFO]               - Python test code in     ET-dot/tests/test_cpp_dotc.py.
[WARNING]            Dependencies added. Run \'poetry update\' to update the project\'s virtual environment.
[INFO]           ] done.
The output explains you where to add the C++ source code, the test code and the documentation. First take care of the warning:
(.venv) > poetry update
Updating dependencies
Resolving dependencies... (1.7s)
No dependencies to install or update
Typically, there will be nothing to install, because micc-build was already installed when
we added the Fortran module dotf (see 2.2 Building binary extensions from Fortran).
Sometimes one of the packages you depend on may just have seen a new release and poetry will
perform an upgrade:
(.venv) > poetry update
Updating dependencies
Resolving dependencies... (1.6s)
Writing lock file
Package operations: 0 installs, 1 update, 0 removals
  - Updating zipp (0.6.0 -> 1.0.0)
(.venv) >
Micc uses pybind11 to create Python wrappers for C++ functions. This is by far the most practical choice for this (see https://channel9.msdn.com/Events/CPP/CppCon-2016/CppCon-2016-Introduction-to-C-python-extensions-and-embedding-Python-in-C-Apps for a good overview of this topic). It has a lot of ‘automagical’ features, and it has a header-only C++ library - so, thus effectively preventing installation problems. Boost.Python offers very similar features, but is not header-only and its library depends on the python version you want to use - so you need a different library for every Python version you want to use.
This is a good point to increment the minor component of the version string:
(.venv) > micc version -m
[INFO]           (ET-dot)> micc version (0.1.1) -> (0.2.0)
Enter this code in the C++ source file ET-dot/et_dot/cpp_dotc/dotc.cpp
#include <pybind11/pybind11.h>
#include <pybind11/numpy.h>

double
dotc( pybind11::array_t<double> a
    , pybind11::array_t<double> b
    )
{
    auto bufa = a.request()
       , bufb = b.request()
       ;
 // verify dimensions and shape:
    if( bufa.ndim != 1 || bufb.ndim != 1 ) {
        throw std::runtime_error("Number of dimensions must be one");
    }
    if( (bufa.shape[0] != bufb.shape[0]) ) {
        throw std::runtime_error("Input shapes must match");
    }
 // provide access to raw memory
 // because the Numpy arrays are mutable by default, py::array_t is mutable too.
 // Below we declare the raw C++ arrays for x and y as const to make their intent clear.
    double const *ptra = static_cast<double const *>(bufa.ptr);
    double const *ptrb = static_cast<double const *>(bufb.ptr);

    double d = 0.0;
    for (size_t i = 0; i < bufa.shape[0]; i++)
        d += ptra[i] * ptrb[i];

    return d;
}

// describe what goes in the module
PYBIND11_MODULE(dotc, m)
{// optional module docstring:
    m.doc() = "pybind11 dotc plugin";
 // list the functions you want to expose:
 // m.def("exposed_name", function_pointer, "doc-string for the exposed function");
    m.def("dotc", &dotc, "The dot product of two arrays 'a' and 'b'.");
}
Obviously the C++ source code is more involved than its Fortran equivalent in the previous section. This is because f2py is a program performing clever introspection into the Fortran source code, whereas pybind11 is nothing but a C++ template library. As such it is not capable of introspection and the user is obliged to use pybind11 for accessing the arguments passed in by Python.
We can now build the module. Because we do not want to rebuild the dotf module
we add -m dotc to the command line, to indicate that only module dotc must
be built:
(.venv)> micc build -m dotc
 [INFO] [ Building cpp module 'dotc':
 [DEBUG]          [ > cmake -D PYTHON_EXECUTABLE=/Users/etijskens/software/dev/workspace/tmp/ET-dot/.venv/bin/python -D pybind11_DIR=/Users/etijskens/software/dev/workspace/tmp/ET-dot/.venv/lib/python3.7/site-packages/et_micc_build/cmake_tools -D CMAKE_BUILD_TYPE=RELEASE ..
 [DEBUG]              (stdout)
                        -- The CXX compiler identification is AppleClang 11.0.0.11000033
                        -- Check for working CXX compiler: /Applications/Xcode.app/Contents/Developer/Toolchains/XcodeDefault.xctoolchain/usr/bin/c++
                        -- Check for working CXX compiler: /Applications/Xcode.app/Contents/Developer/Toolchains/XcodeDefault.xctoolchain/usr/bin/c++ -- works
                        -- Detecting CXX compiler ABI info
                        -- Detecting CXX compiler ABI info - done
                        -- Detecting CXX compile features
                        -- Detecting CXX compile features - done
                        -- Found PythonInterp: /Users/etijskens/software/dev/workspace/tmp/ET-dot/.venv/bin/python (found version "3.7.5")
                        -- Found PythonLibs: /Users/etijskens/.pyenv/versions/3.7.5/lib/libpython3.7m.a
                        -- Performing Test HAS_CPP14_FLAG
                        -- Performing Test HAS_CPP14_FLAG - Success
                        -- Performing Test HAS_FLTO
                        -- Performing Test HAS_FLTO - Success
                        -- LTO enabled
                        -- Configuring done
                        -- Generating done
                        -- Build files have been written to: /Users/etijskens/software/dev/workspace/tmp/ET-dot/et_dot/cpp_dotc/_cmake_build
 [DEBUG]          ] done.
 [DEBUG]          [ > make
 [DEBUG]              (stdout)
                        Scanning dependencies of target dotc
                        [ 50%] Building CXX object CMakeFiles/dotc.dir/dotc.cpp.o
                        [100%] Linking CXX shared module dotc.cpython-37m-darwin.so
                        [100%] Built target dotc
 [DEBUG]          ] done.
 [DEBUG]          >>> os.remove(/Users/etijskens/software/dev/workspace/tmp/ET-dot/et_dot/cpp_dotc/dotc.cpython-37m-darwin.so)
 [DEBUG]          >>> shutil.copyfile( '/Users/etijskens/software/dev/workspace/tmp/ET-dot/et_dot/cpp_dotc/_cmake_build/dotc.cpython-37m-darwin.so', '/Users/etijskens/software/dev/workspace/tmp/ET-dot/et_dot/cpp_dotc/dotc.cpython-37m-darwin.so' )
 [DEBUG]          [ > ln -sf /Users/etijskens/software/dev/workspace/tmp/ET-dot/et_dot/cpp_dotc/dotc.cpython-37m-darwin.so /Users/etijskens/software/dev/workspace/tmp/ET-dot/et_dot/cpp_dotc/dotc.cpython-37m-darwin.so
 [DEBUG]          ] done.
 [INFO] ] done.
 [INFO]           Binary extensions built successfully:
 [INFO]           - /Users/etijskens/software/dev/workspace/tmp/ET-dot/et_dot/dotc.cpython-37m-darwin.so
 (.venv)   >
The output shows that first CMake is called, followed by make and the installation
of the binary extension with a soft link. Finally, lists of modules that have been built
successfully, and modules that failed to build are output.
As usual the micc-build command produces a lot of output, most of which is rather uninteresting
- except in the case of errors. If the source file does not have any syntax errors, and the build
did not experience any problems, you will see a file like dotf.cpython-37m-darwin.so in
directory ET-dot/et_dot:
(.venv) > ls -l et_dot
total 8
-rw-r--r--  1 etijskens  staff  1339 Dec 13 14:40 __init__.py
drwxr-xr-x  4 etijskens  staff   128 Dec 13 14:29 __pycache__/
drwxr-xr-x  7 etijskens  staff   224 Dec 13 14:43 cpp_dotc/
lrwxr-xr-x  1 etijskens  staff    93 Dec 13 14:43 dotc.cpython-37m-darwin.so@ -> /Users/etijskens/software/dev/workspace/tmp/ET-dot/et_dot/cpp_dotc/dotc.cpython-37m-darwin.so
lrwxr-xr-x  1 etijskens  staff    94 Dec 13 14:27 dotf.cpython-37m-darwin.so@ -> /Users/etijskens/software/dev/workspace/tmp/ET-dot/et_dot/f2py_dotf/dotf.cpython-37m-darwin.so
drwxr-xr-x  6 etijskens  staff   192 Dec 13 14:43 f90_dotf/
(.venv) >
Note
The extension of the module dotc.cpython-37m-darwin.so
will depend on the Python version you are using, and on the operating system.
Although we haven’t tested dotc, this is a good point to increment the version
string:
(.venv) > micc version -p
[INFO]           (ET-dot)> micc version (0.2.0) -> (0.2.1)
Here is the test code. It is almost exactly the same as that for the f90 module dotf,
except for the module name. Enter the test code in ET-dot/tests/test_cpp_dotc.py:
import et_dot.dotc as cpp    # import the binary extension
import numpy as np

def test_dotc_aa():
    a = np.array([0,1,2,3,4],dtype=np.float)
    expected = np.dot(a,a)
    a_dotc_a = cpp.dotc(a,a)
    assert a_dotc_a==expected
The conversion between the Numpy arrays to C++ arrays is here less magical, as the user must provide code to do the conversion of Python variables to C++. This has the advantage of showing the mechanics of the conversion more clearly, but it also leaves more space for mistakes, and to beginners it may seem more complicated.
Finally, run pytest:
> pytest
================================ test session starts =================================
platform darwin -- Python 3.7.4, pytest-4.6.5, py-1.8.0, pluggy-0.13.0
rootdir: /Users/etijskens/software/dev/workspace/ET-dot
collected 9 items

tests/test_cpp_dotc.py .                                                       [ 11%]
tests/test_et_dot.py .......                                                   [ 88%]
tests/test_f90_dotf.py .                                                       [100%]

============================== 9 passed in 0.28 seconds ==============================
All our tests passed, which is a good reason to increment the version string and create a tag:
(.venv) > micc version -m -t
[INFO] Creating git tag v0.3.0 for project ET-dot
[INFO] Done.
2.4 Data type issues
An important point of attention when writing binary extension modules - and a common source of problems - is that the data types of the variables passed in from Python must match the data types of the Fortran or C++ routines.
Here is a table with the most relevant numeric data types in Python, Fortran and C++.
| kind | Numpy/Python | Fortran | C++ |
|---|---|---|---|
| unsigned integer | uint32 | N/A | signed long int |
| unsigned integer | uint64 | N/A | signed long long int |
| signed integer | int32 | integer*4 | signed long int |
| signed integer | int64 | integer*8 | signed long long int |
| floating point | float32 | real*4 | float |
| floating point | float64 | real*8 | double |
| complex | complex64 | complex*4 | std::complex<float> |
| complex | complex128 | complex*8 | std::complex<double> |
F2py
F2py is very flexible with respect to data types. In between the
Fortran routine and Python call is a wrapper function which translates the
function call, and if it detects that the data type on the Python sides and
the Fortran sideare different, the wrapper function is allowed to copy/convert
the variable when passing it to Fortran routine both, and also when passing the
result back from the Fortran routine to the Python caller. When the input/output
variables are large arrays copy/conversion operations can have a detrimental
effect on performance and this is in HPC highly undesirable. Micc runs f2py with
the -DF2PY_REPORT_ON_ARRAY_COPY=1 option. This causes your code to produce a
warning everytime the wrapper decides to copy an array. Basically, this warning
means that you have to modify your Python data structure to have the same data
type as the Fortran source code, or vice versa.
Returning large data structures
The result of a Fortran function and a C++ function is always copied back to the Python variable that will hold it. As copying large data structures is detrimental to performance this shoud be avoided. The solution to this problem is to write Fortran functions or subroutines and C++ functions that accept the result variable as an argument and modify it in place, so that the copy operaton is avoided. Consider this example of a Fortran subroutine that computes the sum of two arrays. are some examples of array addition:
subroutine add(a,b,sumab,n)
  ! Compute the sum of arrays a and b and overwrite array sumab with the result
    implicit none

    integer*4              , intent(in)    :: n
    real*8   , dimension(n), intent(in)    :: a,b
    real*8   , dimension(n), intent(inout) :: sumab

  ! declare local variables
    integer*4 :: i

    do i=1,n
        sumab(i) = a(i) + b(i)
    end do
end subroutine add
The crucial issue here is that the result array sumab has intent(inout). If
you qualify the intent of sumab as in you will not be able to overwrite it,
whereas - surprisingly - qualifying it with intent(out) will force f2py to consider
it as a left hand side variable, which implies copying the result on returning.
The code below does exactly the same but uses a function, not to return the result of the computation, but an error code.
function add(a,b,sumab,n)
  ! Compute the sum of arrays a and b and overwrite array sumab with the result
    implicit none

    integer*4              , intent(in)    :: n,add
    real*8   , dimension(n), intent(in)    :: a,b
    real*8   , dimension(n), intent(inout) :: sumab

  ! declare local variables
    integer*4 :: i

    do i=1,n
        sumab(i) = a(i) + b(i)
    end do

    add = ... ! set return value, e.g. an error code.

end function add
The same can be accomplished in C++:
#include <pybind11/pybind11.h>
#include <pybind11/numpy.h>

namespace py = pybind11;

void
add ( py::array_t<double> a
    , py::array_t<double> b
    , py::array_t<double> sumab
    )
{// request buffer description of the arguments
    auto buf_a = a.request()
       , buf_b = b.request()
       , buf_sumab = sumab.request()
       ;
    if( buf_a.ndim != 1
     || buf_b.ndim != 1
     || buf_sumab.ndim != 1 )
    {
        throw std::runtime_error("Number of dimensions must be one");
    }

    if( (buf_a.shape[0] != buf_b.shape[0])
     || (buf_a.shape[0] != buf_sumab.shape[0]) )
    {
        throw std::runtime_error("Input shapes must match");
    }
 // because the Numpy arrays are mutable by default, py::array_t is mutable too.
 // Below we declare the raw C++ arrays for a and b as const to make their intent clear.
    double const *ptr_a     = static_cast<double const *>(buf_a.ptr);
    double const *ptr_b     = static_cast<double const *>(buf_b.ptr);
    double       *ptr_sumab = static_cast<double       *>(buf_sumab.ptr);

    for (size_t i = 0; i < buf_a.shape[0]; i++)
        ptr_sumab[i] = ptr_a[i] + ptr_b[i];
}


PYBIND11_MODULE({{ cookiecutter.module_name }}, m)
{// optional module doc-string
    m.doc() = "pybind11 {{ cookiecutter.module_name }} plugin"; // optional module docstring
 // list the functions you want to expose:
 // m.def("exposed_name", function_pointer, "doc-string for the exposed function");
    m.def("add", &add, "A function which adds two arrays 'a' and 'b' and stores the result in the third, 'sumab'.");
}
Here, care must be taken that when casting buf_sumab.ptr one does not cast to const.
2.5 Specifying compiler options for binary extension modules
[ Advanced Topic ] As we have seen, binary extension modules can be programmed in Fortran and C++. Micc provides convenient wrappers to build such modules. Fortran source code is transformed to a python module using f2py, and C++ source using Pybind11 and CMake. Obviously, in both cases there is a compiler under the hood doing the hard work. By default these tools use the compiler they find on the path, but you may as well specify your favorite compiler.
Note
Compiler options are distinct for f2py modules and cpp modules.
Building a single module only
If you want to build a single binary extension module rather than all binary
extension modules in the project, add the -m|--module option:
This will only build module my_module.
Performing a clean build
To perform a clean build, add the --clean flag to the micc build command:
This will remove the previous build directory and as well as the binary extension module.
Controlling the build of f90 modules
To specify the Fortran compiler, e.g. the GNU fortran compiler:
Note, that this exactly how you would have specified it using f2py directly.
You can specify the Fortran compiler options you want using the --f90flags
option:
In addition f2py (and micc-build for that matter) provides two extra options
--opt for specifying optimization flags, and --arch for specifying architecture
dependent optimization flags. These flags can be turned off by adding --noopt and
--noarch, respectively. This can be convenient when exploring compile options.
Finally, the --debug flag adds debug information during the compilation.
Micc_ build also provides a --build-type options which accepts release and
debug as value (case insensitive). Specifying debug is equivalent to
--debug --noopt --noarch.
Note
ALL f90 modules are built with the same options. To specify separate options
for a particular module use the -m|--module option.
Note
Although there are some commonalities between the compiler options of the various compilers, you will most probably have to change the compiler options when you change the compiler.
Controlling the build of cpp modules
The build of C++ modules can be fully controlled by modifying the the module’s
CMakeLists.txt file to your needs. Micc provides every cpp module with
a template containing examples of frequently used CMake commands commented out.
These include the specification of :
- compiler options
- preprocessor macros
- include directories
- link directories
- link libraries
You just need to uncomment them and provide the values you need:
# ...

# set compiler:
# set(CMAKE_CXX_COMPILER path/to/executable)

# Add compiler options:
# set(CMAKE_CXX_FLAGS "${CMAKE_CXX_FLAGS} <additional C++ compiler options>")

# Add preprocessor macro definitions:
# add_compile_definitions(
#     OPENFOAM=1912                     # set value
#     WM_LABEL_SIZE=$ENV{WM_LABEL_SIZE} # set value from environment variable
#     WM_DP                             # just define the macro
# )

# Add include directories
#include_directories(
#     path/to/dir1
#     path/to/dir2
# )

#...
CMake provides default build options for four build types: DEBUG, MINSIZEREL, RELEASE, and RELWITHDEBINFO.
CMAKE_CXX_FLAGS_DEBUG:-gCMAKE_CXX_FLAGS_MINSIZEREL:-Os -DNDEBUGCMAKE_CXX_FLAGS_RELEASE:-O3 -DNDEBUGCMAKE_CXX_FLAGS_RELWITHDEBINFO:-O2 -g -DNDEBUG
The build type is selected by setting the CMAKE_BUILD_TYPE variable (default:
RELEASE).
For convenience, micc-build provides a command line argument --build-type for
specifying the build type.
Save and load build options to/from file
With the --save option you can save the current build options to a file in .json
format. This acts on a per project basis. E.g.:
will save the <my build options> to the file build.json in every binary module
directory (the .json extension is added if omitted). You can restrict this to a single
module with the --module option (see above). The saved options can be reused in a
later build as:
2.6 Documenting binary extension modules
For Python modules the documentation is automatically extracted from the doc-strings
in the module. However, when it comes to documenting binary extension modules, this
does not seem a good option. Ideally, the source files ET-dot/et_dot/f90_dotf/dotf.f90
amnd ET-dot/et_dot/cpp_dotc/dotc.cpp should document the Fortran functions and
subroutines, and C++ functions, respectively, rahter than the Python interface. Yet
from the perspective of ET-dot being a Python project, the users is only interested
in the documentation of the Python interface to those functions and subroutines.
Therefore, micc requires you to document the Python interface in separate .rst
files:
ET-dot/et_dot/f90_dotf/dotf.rstET-dot/et_dot/cpp_dotc/dotc.rst
Here are the contents, respectively, for ET-dot/et_dot/f90_dotf/dotf.rst:
Module et_dot.dotf
******************

Module :py:mod:`dotf` built from fortran code in :file:`f90_dotf/dotf.f90`.

.. function:: dotf(a,b)
   :module: et_dot.dotf

   Compute the dot product of *a* and *b* (in Fortran.)

   :param a: 1D Numpy array with ``dtype=numpy.float64``
   :param b: 1D Numpy array with ``dtype=numpy.float64``
   :returns: the dot product of *a* and *b*
   :rtype: ``numpy.float64``
and for ET-dot/et_dot/cpp_dotc/dotc.rst:
Module et_dot.dotc
******************

Module :py:mod:`dotc` built from fortran code in :file:`cpp_dotc/dotc.cpp`.

.. function:: dotc(a,b)
   :module: et_dot.dotc

   Compute the dot product of *a* and *b* (in C++.)

   :param a: 1D Numpy array with ``dtype=numpy.float64``
   :param b: 1D Numpy array with ``dtype=numpy.float64``
   :returns: the dot product of *a* and *b*
   :rtype: ``numpy.float64``
Note that the documentation must be entirely in .rst format (see
restructuredText).
Build the documentation:
(.venv) > cd docs && make html
Already installed: click
Already installed: sphinx-click
Already installed: sphinx
Already installed: sphinx-rtd-theme
Running Sphinx v2.2.2
making output directory... done
WARNING: html_static_path entry '_static' does not exist
building [mo]: targets for 0 po files that are out of date
building [html]: targets for 7 source files that are out of date
updating environment: [new config] 7 added, 0 changed, 0 removed
reading sources... [100%] readme
looking for now-outdated files... none found
pickling environment... done
checking consistency... /Users/etijskens/software/dev/workspace/tmp/ET-dot/docs/apps.rst: WARNING: document isn't included in any toctree
done
preparing documents... done
writing output... [100%] readme
generating indices...  genindex py-modindexdone
highlighting module code... [100%] et_dot.dotc
writing additional pages...  search/Users/etijskens/software/dev/workspace/tmp/ET-dot/.venv/lib/python3.7/site-packages/sphinx_rtd_theme/search.html:20: RemovedInSphinx30Warning: To modify script_files in the theme is deprecated. Please insert a <script> tag directly in your theme instead.
  {{ super() }}
done
copying static files... ... done
copying extra files... done
dumping search index in English (code: en)... done
dumping object inventory... done
build succeeded, 2 warnings.

The HTML pages are in _build/html.
The documentation is built using make. The Makefile checks that the necessary components
sphinx, click, sphinx-click_and sphinx-rtd-theme are installed.
You can view the result in your favorite browser:
(.venv) > open _build/html/index.html
The filepath is made evident from the last output line above. This is what the result looks like (html):
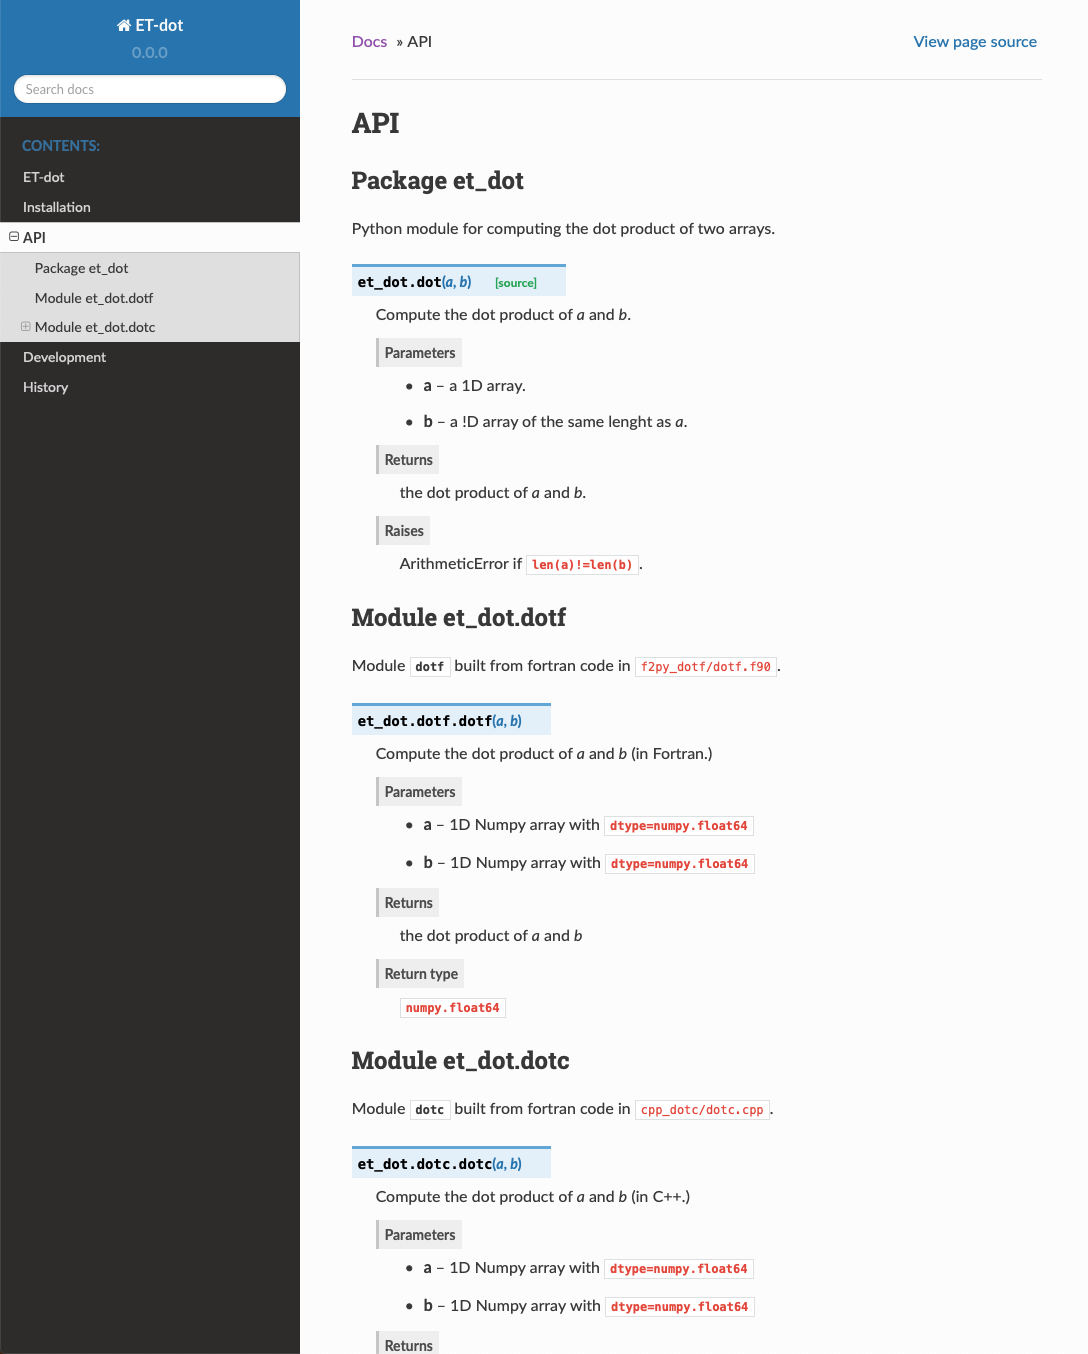
Increment the version string:
(.venv) > micc version -M -t [ERROR] Not a project directory (/Users/etijskens/software/dev/workspace/tmp/ET-dot/docs). (.venv) > cd .. (.venv) > micc version -M -t [INFO] (ET-dot)> micc version (0.3.0) -> (1.0.0) [INFO] Creating git tag v1.0.0 for project ET-dot [INFO] Done.
Note that we first got an error because we are still in the docs directory, and not in the project root directory.
Tutorial 3: Adding Python components
3.1 Adding a Python module
Just as one can add binary extension modules to a package, one can add python modules.
> micc add foo --py

[INFO]           [ Adding python module foo.py to project ET-dot.
[INFO]               - python source in    ET-doc/et_doc/foo.py.
[INFO]               - Python test code in ET-doc/tests/test_foo.py.
[INFO]           ] done.
This adds a Python sub-module to the package, and a test script. The documentation for the sub-module is extracted from doc-strings of the functions and classes in the sub-module.
As with micc create the default structure is that of a simple module, i.e.
ET-doc/et_doc/foo.py. If you want a package you can add the --package
flag.
3.2 Adding a Python Command Line Interface
Command Line Interfaces are Python scripts that you want to be installed as executable programs when a user installs your package.
As an example, assume that we need quite often to read two arrays from file and compute their dot product, and that we want to execute this operation as:
> dot-files file1 file2
dot(file1,file2) = 123.456
>
Micc supports two kinds of CLIs based on click, a very practical tool for building Python CLIs. The first one is for CLIs that execute a single task, the second one for a command with sub-commands, like git or micc itself. The single task case default, so we can create it like:
> micc app dot-files
[INFO]           [ Adding CLI dot-files without sub-commands to project ET-dot.
[INFO]               - Python source file ET-dot/et_dot/cli_dot-files.py.
[INFO]               - Python test code   ET-dot/tests/test_cli_dot-files.py.
[INFO]           ] done.
For a CLI with sub-commands one should add the flag --sub-commands.
The source code ET-dot/et_dot/cli_dot_files.py should be modified as:
# -*- coding: utf-8 -*-
"""Command line interface dot-files (no sub-commands)."""

import sys

import click
import numpy as np

from et_dot.dotf import dotf

@click.command()
@click.argument('file1')
@click.argument('file2')
@click.option('-v', '--verbosity', count=True
             , help="The verbosity of the CLI."
             , default=1
             )
def main(file1,file2,verbosity):
    """Command line interface dot-files.

    A 'hello' world CLI example.
    """
    a = np.genfromtxt(file1, dtype=np.float64, delimiter=',')
    b = np.genfromtxt(file2, dtype=np.float64, delimiter=',')
    ab = dotf(a,b)
    if verbosity>1:
        print(f"dot-files({file1},{file2}) = {ab}")
    else:
        print(ab)

if __name__ == "__main__":
    sys.exit(main())  # pragma: no cover
Here’s how to use it from the command line (without installing):
> source .venv/bin/activate
(.venv) > cat file1.txt
1,2,3,4,5
> cat file2.txt
2,2,2,2,2
(.venv) > python et_dot/cli_dot_files.py file1.txt file2.txt
30.0
(.venv) > python et_dot/cli_dot_files.py file1.txt file2.txt -vv
dot-files(file1.txt,file2.txt) = 30.0
Testing the application
When you add an a application like dot-files Micc automatically adds a test script
tests/test_cli_dot_files.py where you can add your tests.
Testing CLIs is a bit more complex than testing modules, but Click provides some tools
for Testing click applications.
Here is the test code:
#!/usr/bin/env python
# -*- coding: utf-8 -*-

from click.testing import CliRunner

from et_dot.cli_dot_files import main

def test_main():
    runner = CliRunner()
    result = runner.invoke(main, ['file1.txt','file2.txt'])
    print(result.output)
    ab = float(result.output[0:-1])
    assert ab==30.0
Finally, we run pytest:
> pytest
================================= test session starts =================================
platform darwin -- Python 3.7.4, pytest-4.6.5, py-1.8.0, pluggy-0.13.0
rootdir: /Users/etijskens/software/dev/workspace/ET-dot
collected 10 items

tests/test_cli_dot-files.py .                                                   [ 10%]
tests/test_cpp_dotc.py .                                                        [ 20%]
tests/test_et_dot.py .......                                                    [ 90%]
tests/test_f90_dotf.py .                                                       [100%]

================================== 10 passed in 0.33 seconds ==========================
Documenting an application
When adding a CLI, Micc automatically adds documentation entries for it. in APPS.rst.
Calling micc docs will automatically extract documentation from the doc-strings of the command
and the :param ...: of the click.argument decorators in these doc-strings, and
from the help parameters of the click.option decorators.
Tutorial 4: Version control and version management
4.1 Git support
When you create a new project, Micc immediately provides a local git repository for
you and commits the initial files Micc set up for you. If you have a github account you
can register it in the preferences file ~/.micc/micc.json, using the
github_username entry:
{
...
, "github_username"  : {"default":"etijskens"
                       ,"text"   :"your github username"
                       }
...
}
Micc cannot create a remote github repository for you,
but if you registered your github username in the preferences file, it will add
a remote origin at https://github.com/etijskens/<your_project_name>/, and
try to push the files to the github repo. If you have created the remote repository
before you create the project, the new project will be immediately pushed onto
the remote origin. Otherwise, you get a warning that the remote repository does not
yet exist. You can create the remote repository whenever you like and push your work
onto the remote repository using the git CLI.
4.2 Version management
Version numbers are practical, even for a small software project used only by
yourself. For larger projects, certainly when other users start using them,
they become indispensable. When giving version numbers to a project, we highly
recommend to follow the guidelines Semantic Versioning 2.0.
Such a version number consists of Major.minor.patch. According to
semantic versioning you should increment the:
Majorversion when you make incompatible API changes,minorversion when you add functionality in a backwards compatible manner, andpatchversion when you make backwards compatible bug fixes.
Micc sets a version number of 0.0.0 when it creates a project, and you can bump the
version number at any time with the micc version command.
> micc info
Project ET-dot located at /Users/etijskens/software/dev/workspace/ET-dot
  package: et_dot
  version: 0.0.0
  structure: et_dot/__init__.py (Python package)
  contents:
    application cli_dot_files.py
    C++ module  cpp_dotc/dotc.cpp
    f90 module  f90_dotf/dotf.f90
To bump the patch component:
> micc version
Project (ET-dot version (0.0.0)
> micc version --patch
[INFO]           bumping version (0.0.0) -> (0.0.1)
Again, with the short version of --patch and verbose this time, :
> micc -vv version -p
[DEBUG] start = 2019-10-16 13:18:16.995416
[INFO]           bumping version (0.0.1) -> (0.0.2)
[DEBUG]          . Updated (/Users/etijskens/software/dev/workspace/ET-dot/pyproject.toml)
[DEBUG]          . Updated (/Users/etijskens/software/dev/workspace/ET-dot/et_dot/__init__.py)
[DEBUG] stop  = 2019-10-16 13:18:17.261962
[DEBUG] spent = 0:00:00.266546
Here, you can see that micc updated the version number in ET-dot/pyproject.toml
and ET-dot/et_dot/__init__.py.
To bump the minor component use the --minor or -m flag:
> micc version -m
[INFO]           bumping version (0.0.2) -> (0.1.0)
As you can see the patch component is reset to 0.
To bump the major component use the --major or -M flag:
> micc version -M
[INFO]           bumping version (0.1.0) -> (1.0.0)
As you can see the minor component (as well as the patch component) is reset to 0.
The version number has a --tag flag that creates a git tag (see
https://git-scm.com/book/en/v2/Git-Basics-Tagging) and trys
> micc -vv version -p --tag
[DEBUG] start = 2019-10-16 13:37:25.026161
[INFO]           bumping version (1.0.1) -> (1.0.2)
[DEBUG]          . Updated (/Users/etijskens/software/dev/workspace/ET-dot/pyproject.toml)
[DEBUG]          . Updated (/Users/etijskens/software/dev/workspace/ET-dot/et_dot/__init__.py)
[INFO]           Creating git tag v1.0.2 for project ET-dot
[DEBUG]          Running 'git tag -a v1.0.2 -m "tag version 1.0.2"'
[DEBUG]
[DEBUG]          Pushing tag v1.0.2 for project ET-dot
[DEBUG]          Running 'git push origin v1.0.2'
[DEBUG]          remote: Repository not found.
                   fatal: repository 'https://github.com/etijskens/ET-dot/' not found
[INFO]           Done.
[DEBUG] stop  = 2019-10-16 13:37:26.101959
[DEBUG] spent = 0:00:01.075798
If you created a remote github repository for your project and registered your github username in the preferences file, the tag is pushed to the remote origin.
Tutorial 5 - Publishing your code
Publishing your code is an easy way to make your code available to other users.
5.1 Publishing to the Python Package Index
For this we rely on poetry. If you do not have a PyPI account, create one and
run this command in your project directory, e.g. et-foo:
Note
It is crucial that your project name is not already taken. For this reason, we recommend that
- before you create a project that you might want to publish, you check wether your project name is not already taken.
- immediately after your project is created, you publish it, as to reserve the name forever.
Now everyone can install the package in his current Python environment as:
> pip install et-foo
5.2 Publishing packages with binary extension modules
Packages with binary extension modules are published in exactly the same way, that is,
as a Python-only project. When you pip install a Micc project the package directory
will end up in the site-packages directory of the Python environment in which you
install. The source code directories of the binary extensions modules are installed with
the package, but without the binary extensions themselves. These must be compiled locally.
Fortunately that happens automatically, at least if the binary extension were added to
the package by Micc. When Micc adds a binary extension to a project, two thing happen:
- a dependency on micc-build is added to the project, and
- in the top-level module
<package_name>/__init__.pyatry-exceptblock is added that tries to import the binary extension and in case of failure (ModuleNotFoundError) will attempt to build it using the machinery provided by micc-build. This will usually succeed, provided the necessary compilers are available.
As an example, let us create a project foo with a binary extension module bar written in C++
> micc -p Foo create
> cd auto-build
> micc add bar --cpp
This creates this Foo/foo/__init__.py:
# -*- coding: utf-8 -*-
"""
Package foo
===========

Top-level package for foo.
"""

__version__ = 0.0.0

try:
    import foo.bar
except ModuleNotFoundError as e:
    # Try to build this binary extension:
    from pathlib import Path
    import click
    from et_micc_build.cli_micc_build import auto_build_binary_extension
    msg = auto_build_binary_extension(Path(__file__).parent, 'bar')
    if not msg:
        import foo.bar
    else:
        click.secho(msg, fg='bright_red')

def hello(who='world'):
    ...
If the first import foo.bar fails, the except block imports the method
auto_build_binary_extension() and executes it arguments the path to
the package directory :file`Foo/foo` and the name of the binary extension module
bar. If the build succeeds, the msg string is empty and
foo.bar is imported at last, otherwise the error message msg
is printed.
5.3 Providing auto_build_binary_extension() with custom build parameters
The auto-build above will normally use the default build options, corresponding to -O3,
which optimizes for speed. As the auto_build_binary_extension() method is called
automatically, we have not many options to set build options. The
auto_build_binary_extension() method will look for the existence of a file
Foo/foo/cpp_bar/build_options.<platform>.json, where <platform> is Darwin,
on MACOSX, Linux` on Linux and ``Windows on Windows. If it exists, it should contain a
dict with the build options to use.
Note
The build options files are OS specific:
- On MacOSX :
build_options.Darwin.json - On Linux :
build_options.Linux.json - On Windows :
build_options.Windows.json
f90 module build option specifications
All options available to the f2py command line application
can be entered in the build file specification. Pure flags, like e.g. --noopt, which are present
or not, but have no value, are entered in the dictionary with value None. Below are some examples of
much used f2py flags.
import json
from pathlib import Path
import platform

f2py = {
    '--f90exec' : 'f90 compiler executable'
    '--f90flags': 'f90 compiler flags'
    '--opt'     : 'f90 compiler optimization flags'
    '--arch'    : 'f90 compiler architecture specific compiler flags'
    '--noopt'   : None # neglect '--opt' contents
    '--noarch'  : None # neglect '--arch' contents
    '--debug'   : None # compile with debugging information
}
module_srcdir_path = Path(project_path) / package_name / f"f2py_{module_name}"
with (module_srcdir_path / f"build_options.{platform.system()}.json").open('w) as f:
    json.dump(f2py, f)
Note
The Python dictionary f2py is written to file in .json format, which is
human readable. You can also construct it with an editor.
Cpp module build option specifications
For cpp binary extension modules the build tool is CMake. Here, the entries of the build options dict consist of any CMake variable and its desired value.
import json
from pathlib import Path
import platform

cmake = {
    'CMAKE_BUILD_TYPE' : 'RELEASE',
    ...
}
module_srcdir_path = Path(project_path) / package_name / f"cpp_{module_name}"
with (module_srcdir_path / f"build_options.{platform.system()}.json").open('w) as f:
    json.dump(cmake, f)
5.4 Publishing your documentation on readthedocs.org
Publishing your documentation to Readthedocs relieves the users of your code from having to build documentation themselves. Making it happen is very easy. First, make sure the git repository of your code is published on Github.Second, create a Readthedocs account if you do not already have one. Then, go to your Readthedocs page, go to your projects and hit import project. Fill in the fields and every time you push commits to Github its documentation will be rebuild automatically and published.
Note
Sphinx must be able to import your project in order to extract the documentation.
If your codes depend on Python modules other than the standard library, this will fail and
the documentation will not be built. You can add the necessary dependencies to
<your-project>/docs/requirements.txt.
This document walks you through the differences of using micc to manage your python+C++/Fortran projects on the VSC clusters. If you are already familiar with the use of HPC environments, the only relevant part of this tutorial is section 6.2 Using Poetry on the cluster. Otherwise, it is recommended to go through the entire tutorial.
Note
This tutorial uses the Leibniz cluster of the University of Antwerp for the examples. The principles pertain, however, to all VSC clusters, and most probably also to other clusters using a module system for exposing its software stack.
Tutorial 6 - Using micc projects on the VSC clusters
Most differences between using your local machine or a cluster stem from the fact that a cluster, typically, uses a module system for making software available to the user on a login node (interactive mode) and to a compute node (batch mode). In addition, the cluster uses a scheduler that determines when your compute jobs are executed.
The tools we need are, typically:
- a modern Python version. As Python 2.7 is officially discontinued, that would probably be 3.7 or later.
- common Python packages for computing, like Numpy, scipy, matplotlib, …
- compilers for C++ and/or Fortran, for compiling binary extensions.
- CMake, as the build system for C++ binary extensions.
- git, for version control, if we are developing code on the cluster.
6.1 Using modules
The cluster’s operating system exposes some of these tools, but, they lag many versions behind and, although very reliable, they are not fit for high performance computing purposes.
As an example consider the GCC C++ compiler g++. Here is the g++ version
exposed by the operating system (at the day of writing: August 2020):
> which g++
/usr/bin/g++
> g++ --version
g++ (GCC) 4.8.5 20150623 (Red Hat 4.8.5-39)
...
Still at the day of writing, the latest GCC version is 6 major versions ahead of that: 10.2! The OS g++ is very reliable for building operating system components but it is not suited for building C++ binary extensions that must squeeze the last bit of performance out of the cluster’s hardware. Obviously, this old g++ can impossibly be aware of modern hardware, and, consequentially, cannot generate code that exploit all the modern hardware features introduced for improving performance of scientific computations.
Similarly, the OS Python is 2.7.5, whereas 3.9 is almost released, and 2.7.x isn’t even officially supported anymore.
So as a rule of thumb:
Never use the tools provided by the operating system.
As the preinstalled modules are built by VSC specialists for optimal performance on the cluster hardware, this rule should be extended as:
Do not install your own tools (unless they are not performance critical, or, you are a specialist yourself).
If you need some software package, a library, a Python module, or, whatever, which is not available as a cluster module, especially, if it is performance critical, contact your local VSC team and they will build and install it for you (and all other users).
The VSC Team has installed many software packages ready to be used for high performance computing. In fact, they are built using the modern compilers and with optimal performance in mind. Contrary to what you are used to on your personal computer where installed software packages are immediately accessible, on the cluster an extra step must be taken to make installed packages accessible.
If you are unsure whether a command is provided by the operating system or not, use the
linux which command:
> which g++
/usr/bin/g++
Typically, commands of the operating system are found in /usr/bin and should
usually not be used for high performance computing. Commands provided by some
cluster module are, typically, found in /apps/<vsc-site>/....
Note
The which cmd command shows the path to the first cmd on the PATH
environment variable.
So, how do we get access to the commands we are supposed to use?
HPC packages are installed as modules and to make
them accessible, they must be loaded. Loading a module means that your operating system
environment is modified such that it can find the software’s executables, that is, the
directories containing its executables are added to the PATH variable. In additio,
other environment variables adjusted or added to make everything work smoothly.
E.g., to use a recent version of git we load the git module:
> module load git
> which git
/apps/antwerpen/broadwell/centos7/git/2.13.3/bin/git
> git --version
git version 2.13.3
Before we loaded git, the which command would have shown:
> which git
/usr/bin/git
> git --version
git version 1.8.3.1
A much older version, indeed.
You can search for modules containing e.g. the word gcc (case insensitive):
> module spider gcc
...
If you know the package name, you can list the available versions with module av. Here are
the available Python versions (the command is case insensitive):
> module av python/
which on Leibniz returns:
----------------------------------------------------- /apps/antwerpen/modules/centos7/software-broadwell/2019b -----------------------------------------------------
   Biopython/1.74-GCCcore-8.3.0-IntelPython3-2019b    Biopython/1.74-intel-2019b-Python-3.7.4 (D)    Python/3.7.4-intel-2019b (D)
   Biopython/1.74-intel-2019b-Python-2.7.16           Python/2.7.16-intel-2019b

----------------------------------------------------- /apps/antwerpen/modules/centos7/software-broadwell/2018b -----------------------------------------------------
   Python/2.7.15-intel-2018b    Python/3.6.8-intel-2018b    Python/3.7.0-intel-2018b    Python/3.7.1-intel-2018b

----------------------------------------------------- /apps/antwerpen/modules/centos7/software-broadwell/2018a -----------------------------------------------------
   Python/2.7.14-intel-2018a    Python/3.6.4-intel-2018a    Python/3.6.6-intel-2018a

----------------------------------------------------- /apps/antwerpen/modules/centos7/software-broadwell/2017a -----------------------------------------------------
   Biopython/1.68-intel-2017a-Python-2.7.13    pbs_python/4.6.0-intel-2017a-Python-2.7.13    Python/3.6.1-intel-2017a
   Biopython/1.68-intel-2017a-Python-3.6.1     Python/2.7.13-intel-2017a

  Where:
   D:  Default Module

If you need software that is not listed, request it at hpc@uantwerpen.be
Please, mind the last line. If you need something that is not pre-installed, request it at mailto:hpc@antwerpen.be
You can unload a module:
> module unload git
> which git
/usr/bin/git
The current git command is that of the OS again.
You can unload all modules:
> module purge
To learn the details about the VSC clusters’ module system, consult Using the module system.
6.2 Using Poetry on the cluster
6.2.1 Installing Poetry
Poetry is, sofar, not available as a cluster module. You must install it yourself. The installation method recommended by the poetry_documentation is also applicable on the cluster (even when the system Python version is still 2.7.x):
> module purge
> curl -sSL https://raw.githubusercontent.com/python-poetry/poetry/master/get-poetry.py | python
The module purge command ensures that the system Python is used for the Poetry installation.
This allows you to have a single poetry installation that works for all Python versions that you
might want to use. So, internally, poetry commands use the system Python which is always available,
but your projects can use any Python version that is made avaible by loading a cluster module, or,
that you installed yourself.
6.2.2 Using pre-installed Python packages
As the cluster modules generally come with pre-installed Python packages which are built
to achieve optimal performance in a HPC environment, e.g. Numpy, Scipy,
…) we do not want poetry install to reinstall these packages in your project’s virtual
environment. That would lead to suboptimal performance, and waste disk space. Fortunately,
there is a way to tell Poetry that it must use pre-installed Python packages:
> mkdir -p ~/.cache/pypoetry/virtualenvs/.venv
> echo 'include-system-site-packages = true' > ~/.cache/pypoetry/virtualenvs/.venv/pyvenv.cfg'
(If the name of your project’s virtual environment is not .venv, replace it with the
name of your project’s virtual environment).
6.3 Using micc on the cluster
First, we make sure to load a modern Python version for our project. The VSC clusters have many Python versions available, and come in different flavours, depending on the toolchain that was used to build them. On Leibniz, e.g., we would load:
> module load leibniz/2019b     # unleashed all modules compiled with the intel-2019b toolchain
> module load Python/3.7.4-intel-2019b
This module comes with a number of pre-installed Python package wich you can see using;;
> ll $(dirname which python)/../lib/python3.7/site-packages
The above Python/3.7.4-intel-2019b is a good choice. Usually, loading a Python module
will automatically also make the C++ and Fortran compilers available that were used to compile
that Python module. They are, obviously, needed for building binary extensions from C++ and
Fortran code.
in addition, Micc relies on a number of other software package to do its work.
Git, our preferred version control system. The system
gitis a bit old, hence:> module purge > git --version git version 1.8.3.1 # this is the system git > module load git > git --version git version 2.13.3
For building binary extensions from C++ we need CMake, hence:
> cmake --version
cmake version 2.8.12.2 # this is the system CMake
> module load leibniz/2019b
> module load CMake
> cmake --version
cmake version 3.11.1
For building binary extensions from Fortran, we need f2py, which is made available from Numpy. Hence, we need to load a cluster Python module with Numpy pre-installed (please check `7.2.2 Using pre-installed Python packages`_ for this). The above loaded Python version is ok for that.